Guest Blogger: Lace Tank Tutorial from Kate Johnson

Finishing off the Guest Blogger series is my wonderful sister, a crafting diva, who is a huge source of inspiration to me.  Everything she makes is adorable, and Maddie and Sammy are always the best-dressed kids around!  Take a look at that hat Sammy is wearing in the image above, Kate made that!  She has to have made over 20 hats now (all for Sammy), so if you are in the market for a baby hat, let me know and maybe I can convince her to start selling them!!  Enjoy this great tutorial for a simple lace tank top.  This would look so cute with my Lace Panties!!  Thanks, Kate!!

_____________________________________________________________________

Lace Tank Tutorial

from Kate Johnson (my sis)

I’ve been sewing my daughter Maddie lots of cute, reversible summer skirts with bright colors and busy patterns.  The only problem is, it’s really hard to find a  top to go with such colorful bottoms.  I designed this simple tank to go along with her skirts, and realized it would be perfect and easy for an adult size too!  I’ve gotten them down to about 20 minutes each, so I can make  one to match any skirt.  I’ve also used this same pattern for the top of a dress, and then attached a silk chiffon skirt to the bottom for a more dressy look. Enjoy!

Materials:

– Stretch lace – see panties tutorial for a great place to buy stretch lace- you will need enough to go around neckline and armholes- use tape measure to determine amount to purchase.

– Knit fabric or old tee-shirt- amount depends on size tank you are making

1.  Draw out pattern (one front and one back).   Take your favorite tank and simply trace the outline.  A trick I use to outline the front neckline is I use my seam ripper or other sharp tool, and poke little holes all along curve, onto paper below, then connect dots with pen.  After, add 1/2″ seam allowance everywhere except neckline and armhole (you will be adding lace here so no seam allowance is needed), and 1″ for bottom hem.  I am making a toddler size in the pictures (click images to enlarge).

2. Cut out pattern.  Test your knit fabric to see which way it stretches most, and cut out so that your width is stretchy (so when you put it over your shoulders it will stretch for you).

3. Cut lace for front and back neckline.  On right side of knit, I like to pin the lace to raw edge of neckline with a slight stretch- not enough that your knit gathers but just enough ensure your lace will not bunch or sag. Sometimes I don’t even pin or cut,  I just start sewing it on with a very slight stretch, then cut when I get to the edge.

4. Using a zigzag or stretch stitch, sew lace on to knit- once right along raw edge of knit and once right along edge of lace.

5. Right sides together, sew front to back at side seams of tank.

6. On right side of tank, pin lace to armhole, extending from front of tank to back in one long piece.  Sew as in step #4. Repeat with other armhole.

7. Right sides together, sew front to back at shoulder seam, taking care to line up lace.

8.  Press bottom raw edge 1/2 inch towards wrong side, then again, and hem.  Or, do as I do and leave as raw edge! It’s for a 2-year-old, come on, no one will notice! Enjoy!

Guest Blogger: Trivet Tutorial from Kari of Handmade Mommy

I first met our next Guest Blogger, Kari from Handmade Mommy, when she won my Allmodern.com Giveaway.  She was so excited and decided right away to join in my Pattern Challenge.  Kari’s a super sweet mom who’s totally crafty-minded.  I follow her blog and always look forward to reading her posts and seeing what cute things she’s made.  Look at this adorable fishing reel bag she recently made for her husband!

Thanks, Kari, for this great tutorial!  Those trivets are so fun, I can’t wait to try it!

_____________________________________________________________________

Quick & Easy Kitchen Trivet Tutorial

from Handmade Mommy

Hi there! I’m Kari from Handmade Mommy and am thrilled to be hanging out here. I’m sure Sarah is having a blast galavanting about in Europe and will bring back some great photos for us. But, in the meantime, here’s a little tutorial to keep your hands busy…

Awhile back, I made some coasters (beer coasters, to be exact) as Christmas gifts. Ever since then, I’ve been wanting to do something else with ceramic tiles…I just couldn’t decide what. Then a blogging friend suggested kitchen trivets. Eureka! And kitschy retro kitchen trivets would be even better. So I hauled my slightly unwilling boys to the hardware store and picked up supplies. If you get the bug to make some, here’s what you’ll need:

Supplies:

-One 6″x6″ matte finish ceramic tile
-One super cute vintage image
-Spray adhesive
-Clear Gloss Spray enamel
-Adhesive bumpers for the the bottom of your tile

It helps if you have a slight addiction to old books and just happen to have vintage cookbooks lying around with great images buried in them. Such as the little gem I found in The American Woman’s Cook Book (copyright 1944, edited by Ruth Berolzheimer). Apparently, electric mixers were still a bit of a novelty back then; if you look closely, the text says “The machine beats time as well as batter while you supply the brain that makes the cake.” I don’t know about you, but I’ll take praise for my kitchen smarts wherever I can.

1.  First, print out your image on regular printer paper and cut it to size. Then, spray the back with adhesive (this is much easier and less messy than spraying the tile itself). Make sure to get a really good coat on the paper and let it get tacky for a few seconds (follow label directions).

2.  Align your paper on the tile and smooth out any air bubbles with a roller, spatula, or the highly specialized tool, the credit card.

3.  Next, spray the tile with your clear enamel. Several light coats a couple minutes apart works well. I did it just until the paper started to look glossy and then walked away. Then I waited an hour or so and did this again. Let your enamel dry.

4.  Stick your little bumpers on the bottom so your trivet doesn’t scratch the table. And you’re done!

Now admire your brand new trivet and use it with pride!

Thanks again for having me, Sarah!

Guest Blogger: Applique Tutorial from Beth of Lemon Cadet

Today’s Guest Blogger is Beth from Lemon Cadet.  Beth is a blogging veteran (going strong since 2006!!) whose blog focuses on what various projects she’s got going on at the time.  Oftentimes this includes stories of the latest craft fair she participated in, photos of the seriously cute and quirky items she’s listed in her Etsy Shop, or links to the numerous sources who have featured her work (Parents Magazine, Small Magazine, ohdeedoh, The Storque: Handmade Kids, Ikea Hacker….to name a few!).

I’m a bit obsessed with the cute things she’s selling in her shop.  The adorable bean romper in the collage above is available from her shop here, and modelled by her oh-so-cute daughter, Zadie.  Beth’s clothing features a lot of appliqués (an applique is when a piece of fabric is sewn onto another piece of fabric, to create a design), which makes her the perfect source for an Appliqué Tutorial!  Thanks for the great instructions, Beth!

_____________________________________________________________________

Appliqué Tutorial from Lemon Cadet

Materials:

-Wonder Under 805 (my fusible interfacing of choice)
-Tear-away interfacing (I’m too lazy for this)
-Needle (knit or regular, more on this later)
-Poly thread (cotton thread may mess with the shrinkage)
-Plain garment that needs some jazz (or the supplies to make a garment from scratch)
-Fabric
-Scissors (not your fabric scissors)
-Iron (don’t use the steam setting, listen to me and don’t learn the hard way)

Things to consider:

Needles. I have found that my machine sometimes likes a knit needle for appliqué onto a knit fabric and sometimes it does not. It’s best to do some tests. Every machine has its own issues and you just never know until you try.
Tear-away interfacing. This is really helpful if you are stitching onto knits but I never bother with it. Practice makes perfect and saves time and money.
New construction. If you are wanting to appliqué onto a garment that you are constructing, consider carefully the placement of the embellishment. It may be easier to appliqué on a piece rather than the whole thing – especially with pants. You probably won’t be able to get a pant leg where it needs to be in the machine to appliqué after you’ve sewn up your seams.

Let’s get started:

1.  Iron your Wonder Under to the back of your design fabric. It helps to have your pattern ready so you’ll know how much to cut.

2.  Pin your pattern pieces to the Wonder Under and cut. You should not use your good scissors as you’re cutting through paper, gluey stuff, and fabric. I have a special pair of scissors just for this. Nothing dulls scissors faster than this combo.

3.  Remove pins and set the pattern aside. Peel the Wonder Under backing paper off of the design and place it onto your fabric.

4.  Iron in place.

Time to stitch:

1.  Do a test of your zig zag stitch. Play around with it a little bit until you get a look you like. A bigger stitch width and a longer stitch length will allow for more fraying. For the outside of the bunny, I used a 3 stitch width and my stitch length is set on the last (longest) line of the buttonhole stitch.

2.  Loosen up your presser foot pressure so it’s easier to turn the corners.

3.  First, make a tack knot by doing a couple of straight stitches in place. Then move your stitch selector to the zig zag and go carefully around the outside of your shape.

4.  Keep your needle in the down position while sewing. That way if you need to pick up your foot to turn a corner, you won’t get off track with your stitches. Hint: when sewing around a convex turn (like around the top of the bunny ear), keep your needle on the outside of the fabric. When sewing within a concave turn (like that part of the head between the two ears), keep it on the inside. It will keep a better pivot point and won’t be noticeable at all.

5.  If you make a bit of a mess, don’t worry; it won’t be so noticeable after the wash.

6.  When you’re finished, make another tack knot.

7.  Switch colors and do a second layer if you have one. A dirty little trick is to choose a bobbin color halfway between the two topstitches so that you won’t have to change it. Ha ha.

8.  Depending on your design, you might be finished. Or you can keep on going and do some embroidery (you won’t need a hoop as the fabric and the interfacing combine for a nice surface) or some stenciling with freezer paper. The options are endless.

Guest Blogger: Swedish Pancakes Recipe from Kristie of Above the Clouds

Blogging for us today is Kristie of Above the Clouds.  Kristie is a new blogger, but she has a lot to offer the craft world. 

Kristie’s newest obsession is clothes making, and I first found Kristie’s blog when she joined along in my Pattern Challenge.  Since then she’s made some adorable clothes that have got me all kinds of inspired!

Today she’s sharing with you her recipe for Swedish Pancakes, which would make a wonderful Mother’s Day Brunch.  I always love to order swedish pancakes when we go out to breakfast, but I have never tried making them myself!  They look absolutely delicious!  Thanks so much for sharing, Kristie!

 _____________________________________________________________________

Mother’s Day Brunch:  Swedish Pancakes by Above the Clouds


I’m so excited to be here on Come and See the Seitz!  My name is Kristie from Above the Clouds and I found Sarah through her Pattern Challenge.  She has inspired me with all her sewing projects, quilts and stylish clothes.  I love to sew and create and have recently become addicted to sewing clothes for my one year old daughter and myself.  Thanks Sarah for having me!  This is so fun. 

It’s time to celebrate Mom.  Why not do it with a delicious brunch with the whole family.  This recipe is a family favorite on my husband’s side and one that is asked for over and over. It’s like having desert for breakfast.  I’m going to share with you our family’s yummy recipe for Swedish Pancakes.

Ingredients:

  -6 eggs
  -1 1/2 cups flour
  -dash of salt
  -1 Tbsp sugar
  -2 1/2 cups milk
  -1 stick of butter (melted)

Directions:

1.  Beat eggs until lemon colored.

2.  Add flour, salt and sugar.

3.  Add milk IN THREE GROUPS. Batter will be very thin.

4.  Add melted butter.

5.  Let stand for 15 minutes.

6.  Pour 1/4 cup of batter into a hot skillet and tilt pan to thin out and make pancake shape.  When edges are set, flip pancake.

Makes APPROXIMATELY 30-35 pancakes. Serving size is about 3-4 per person or more for the hungry guys.

We like to scoop some fresh juicy strawberries and whip cream in side, roll them up and drizzle syrup on top.  I also like to eat them with just whip cream inside and syrup.  Yum!  

Be creative.  Fill them with your favorite fruit.  I originally had this with lingon berries which is more traditional, but a bit too tart for me. I’ve never tried it, but I bet scrambled eggs and ham would be delicious.

On this day, we had powdered sugar, bananas, chocolate chips, mixed berries (from frozen bag) and some fresh strawberries smashed with sugar.

Watch out! They’re so thin and scrumptious it ’s hard to stop eating them.

Enjoy and Happy Mother’s Day.

~Kristie

Guest Blogger: Tutorial Roundup by Pin. Sew. Press.

Pin. Sew. Press. is a new blog that is packed with inspiring finished projects, beautiful photos, quilty goodness and much more!  Everything that Mary of Pin. Sew. Press. makes is constructed beautifully and made out of the cutest fabrics; she has a great eye for design.

Mary’s post will give you some ideas for some last-minute gift ideas for Mother’s Day.  You’ve still got a couple of days left to make something.  Thanks, Mary for compiling this great round-up!

_____________________________________________________________________

Last Minute Sewing for Mom:

Tutorial Roundup by Pin. Sew. Press.

It’s almost Mother’s Day!  How about a handmade gift for Mom this year?

Here are some of my favorite free online tutorials, and I’ve sewn them all!

For the Home

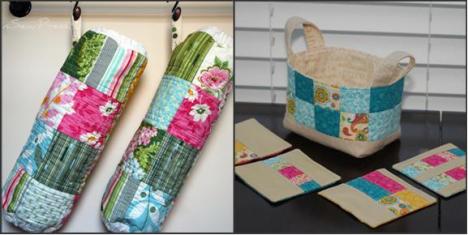
1: Grocery Bag Dispensers, 2: Fabric Basket and coasters (coasters are my own design – no pattern)

~~~~

Accessories

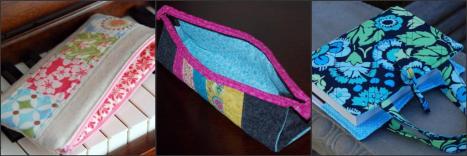
1: Patchwork Pencil Pouch, 2: Stylish Pen Case, 3: Quilted Bible Cover

~~~~

Bags

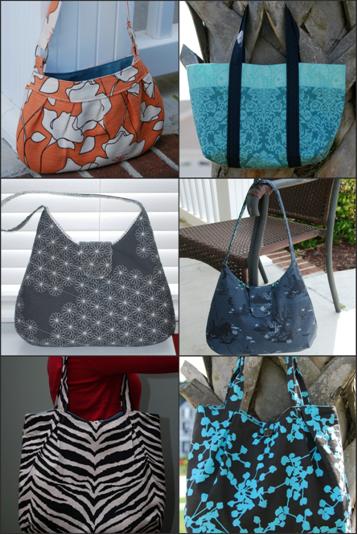
Row 1: Buttercup Bag, Simple Six-Pocket Tote
Row 2:
Phoebe Bags
Row 3:
Pleated Totes

~~~~

There you have it!  Now go sew something nice for your mom!

Happy sewing!

Mary

Guest Blogger: Tear Drop Clothes Pin Bag Tutorial by Liesl Made

While I’m away, I’ve asked some seriously creative bloggers to offer up some goodies to share with you all.  This is the first in my upcoming series of Guest Bloggers

Today I have for you Liesl, of Liesl Made.  I’ve been following Liesl’s blog for well over a year now, and I can assure you that you will not regret instantly adding her blog to your Google Reader.

Liesl’s blog is a nest of creative tutorials, beautiful photos, inspiring links and the occasional vegan recipe.

Today she’s sharing with you her tutorial for an adorable Tear Drop Clothes Pin Bag.  I am definitely making one of these when I get back from Europe!

 _________________________________________________________________________

Tear Drop Clothes Pin Bag by Liesl Made

Pattern Pieces (click the links below to print):

Piece A
Piece B
Piece C
Pieces D and E

Materials Needed:

  – A little over 1/2 yard (about 20″) of home decor weight fabric
  – A little over 1/2 yard (about 20″) of lining fabric
  – 6” twill tape (I used 3/8”)
  – Pattern pieces:  Back piece A, Back piece B, Front bottom C, Front bottom D, Front top E

Make the Bag:

1.  Start by printing the pattern pieces. There is a 1” scale to be sure each piece is sized accordingly. But if it’s a little off, don’t worry about it–as long as all the pieces are to scale to one another. The finished bag is about 15″ wide by 18″ tall.

2.  Cut out the pattern pieces.  Using tape, connect piece A to piece B to make the clothes pin bag back pattern piece. Connect piece C to piece D to make the front bottom. You’ll now have a total of three pattern pieces.

3.  Cut out one from the fabric and one from the lining for each pattern piece on the fold of the fabric.

4.  Stitch the twill tape to the top of the front of the fabric back piece, about 1/8” from the edge, as seen below. This will hold it in place when stitching later.

5.  With right sides together, stitch the front top fabric and front top lining together along inside curve. Do the same for the fabric and lining of the front bottom piece. Clip in seam allowance to ease the curve. Turn right side out and press. Topstitch along inside curves.

6.  Layer as such:
  – Lining back, right side down
  – Fabric back, right side up
  – Front top fabric and lining that you just stitched together, fabric side down
  – Front bottom and lining that you just stitched together, fabric side down

7.  Pin and stitch a 1/4″ all around the outside edge.

8.  Trim seam allowance to 1/8”. Turn right side out, push seams out nice and neat and press.

9.  Topstitch 1/4″ all around the edge. This will encase the raw edge inside the seam and make for a nice finish.

10.  Fill with clothes pins and voila!

Guest Blogger Post and a Giveaway: A Very Sweet Party!

Over the weekend, my sister (who lives 2 states away from me in California) threw the cutest party for my niece and I asked her to share about it with all of you!  My sister and I have such similar taste when it comes to all things crafty, and I hope that someday we can live close to each other and start a sewing business together!

Read on to hear from my sister, Kate, about Maddie’s party and be sure to check out the bottom of this post for a little giveaway!

________________

When I was thinking about what theme I wanted for my daughter Maddie’s 2nd birthday, I immediately thought of all the things she loves such as Dora, Mickey Mouse, and Winnie the Pooh.  Call me selfish, but I just couldn’t stomach another character themed birthday-filled day… So what else could I think of that would not only please Maddie but would meet the approval of her mother who loves all things pink, girly, and sweet? How about candy? Lots and lots: m&m’s and reese’s, gummy bears and lollipops, cookies with pink frosting and mini cupcakes.  Let’s call it Madelyn’s Sweet Shoppe, and embrace the little kid in all of us.  Forget our New Year’s Resolution diets; let’s utterly and completely indulge all day!

I found these amazing labels from eatdrinkchic, and fell in love with the pink and white stripes and pretty much everything else for the ice cream party.  I thought this would make a perfect sweet shoppe color pallet too.

I made all the girls little mini purses and the boys draw-string pouches with left-over fabric I had.  They were super easy and quick to make, and so adorable on them!

Sammy was the life of the party as usual!

Maddie (right) with her best friend Addie, drinking margaritas, engaging in deep and meaningful conversation.  To make the margaritas, just mix 1 bottle of Jose Cuervo (non-alcoholic) margarita mix with ice and lime juice.  Blend with fresh strawberries for a fun pink twist.

Here are the girls in front of a fun background I made for taking pictures. I used a tri-fold cardboard display, and painted on the pink and white stripes.  The flags were cut out with felt and I glued on flowers in the window box.

We played “Pin the Cherry on the Ice Cream Cone,” which the kids loved!  You can see the board I made in the background of the picture above.


I cut out letters for the Happy Birthday banner using adorable Amy Butler paper.

All the kids had a blast, and loved picking out their candy at the end and putting it in their candy purses and bags (with their mother’s hovering over them trying to limit the amount their kid grabs, all the while shooting me evil looks!).

________________

Thanks, Kate!  I so wish I could have been there!  That’s Kate, on the right, right holding my adorable nephew, Sammy.  Natalie, on the left, was the extraordinary baker behind the gorgeous mini cupcakes.  I heard they were delicious!

________________

Kate is giving away two of these mini-purses to two lucky readers!  

Just leave a comment on this post letting me know what your favorite kind of candy is!  I’ll choose the winners next Monday, March 1st.