Chocolate Guinness Pudding

We went to a friend’s Oscar party last night and the theme of the party was “This is Why You’re Fat.”  We were encouraged to bring the most fattening/sinful concoction we could find.  I found a recipe on Epicurious for Chocolate Guinness Goodness which contained no less than 16 egg yolks, 6 cups of heavy cream, 2 cups sugar, 2 cans Guinness and 14 oz. bittersweet chocolate (after doubling the recipe).  Oh my!  I figured this recipe was fattening enough to make the cut. 

These would make a great dessert for a St. Patty’s Day party.  The pudding has a deep, rich chocolate flavor and you might even get hints of coffee (which comes from the Guinness).  The whip cream topping has a nice Guinness hint, but it’s overbearing.  My husband declared them delicious! 

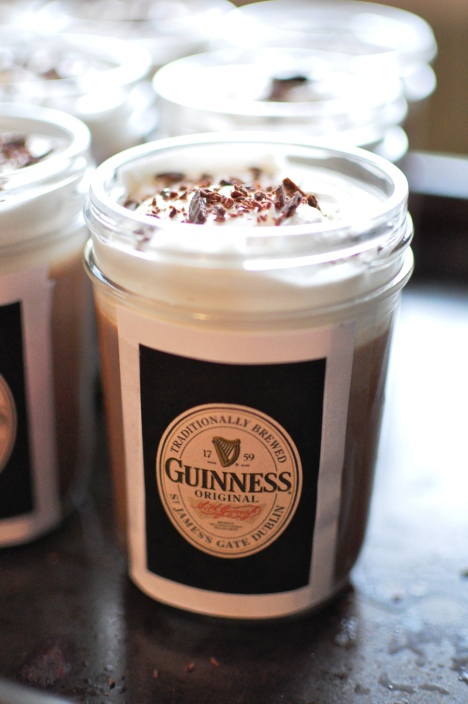
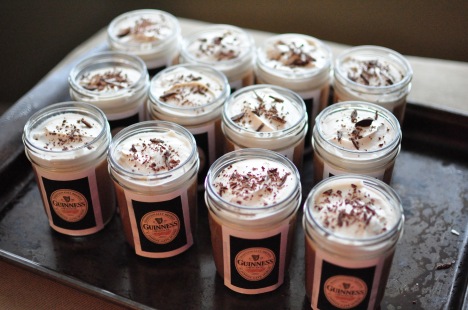
To make 12 servings, buy a dozen 8 oz. canning jars.  I made Guinness labels and adhered them to the jars using double-sided tape.  Find the recipe below, which I slightly adapted from Epicurious, and my printable Guinness labels here: 

Guinness_Pudding_Labels

Chocolate Guinness Pudding

adapted, slightly, from Epicurious
12 servings

Ingredients:

  • 16 large egg yolks
  • 2 cup sugar
  • Two 14.9-ounce can Guinness Draught
  • 6 cups heavy cream
  • 14 ounces high-quality bittersweet (70 to 72% cacao) chocolate, finely chopped
  • 2 tablespoons powdered sugar
  • 1 tablespoon vanilla extract

Instructions:

In large nonreactive mixing bowl, whisk together egg yolks and sugar.

Open can of Guinness and pour into large, heavy-bottomed saucepan (pour down side of cup to reduce foaming). Add 4 1/2 cups cream and whisk to combine. Set over medium heat and heat, whisking occasionally, until bubbles just begin to form at edges. Remove from heat, add chocolate, and whisk until smooth.

Slowly pour hot chocolate mixture into eggs, whisking constantly to prevent curdling. Return mixture to saucepan and set over moderately low heat. Cook, whisking constantly, until mixture thickens and coats back of spoon, about 15 minutes. To test if the pudding has set, pour a small amount of pudding onto a small plate and refrigerate until set.  Turn the plate upside down to see if the pudding has set.  If the cold pudding runs off the plate, continue heating the pudding mixture a bit longer. 

Pour pudding mixture into blender and blend on high for 1 minute. Divide pudding among 12 jars, leaving at least 1 inch of space at top of each. Cover with plastic wrap and refrigerate until chilled and set (overnight, preferably).

Meanwhile, pour the other can of Guinness into small saucepan and bring to boil over medium heat. Reduce heat to medium heat and simmer, uncovered, until reduced to 2 tablespoon, about 20 minutes. Pour syrup into small bowl and let cool.

Beat remaining cream until soft peaks form. Mix in approximately 2 tbsp. powdered sugar and 1 tbsp. vanilla (or to taste).  Add Guinness syrup and beat until combined. Using an ice cream scoop, carefully divide cream among 12 glasses of pudding and tap jar to smooth surface.  Top with shaved chocolate and serve.

My Favorite Quiche Recipe (plus Oven Fries)

I’ve made this quiche so many times I couldn’t even begin to count.  I don’t remember one time when it didn’t turn out great!  It is one of those completely fail safe customizable recipes that you will make over and over again.  I’m surprised I haven’t shared this before now, but I hope some of you will try this!  I’m also sharing a recipe for delicious Oven Fries.  Cook these alongside the quiche for a perfect compliment.

Weeknight Quiche Recipe

Ingredients:

-Frozen pie crust, thawed for 15 minutes
-3 eggs
-1/4 cup half and half (half whole milk, half single cream)
-1 1/2 cup milk (I use 1%, but you can use whatever you have on hand)
-1/2 tsp. salt
-dash of nutmeg or paprika
-dash of pepper
-1 cup grated swiss (NOTE:  You can substitute mozzarella, goat cheese, monterey jack or even feta; just make sure you have 1 cup)
-1/2 onion, diced
-5 slices bacon, cooked to crisp and cut in small pieces (NOTE:  There are tons of options for substitutions here if you don’t eat meat or could spare the extra calories.  Use what you have on hand:  I love using a handful of sliced cherry tomatoes, spinach, ground sausage, or diced red bell peppers.)

Instructions:

1.  Preheat the oven to 375 degrees.

2.  After the pie crust has thawed for 15 minutes, pre-cook the crust alone for 15 minutes.

3.  While the crust is cooking, saute the onion in butter or olive oil (season with salt while cooking) until transluscent and slightly browed.  Be sure to also saute your cherry tomatoes, spinach or bell peppers, if you choose to use one of those instead of bacon.

4.  Meanwhile combine the eggs (slighly beaten), milk, half and half and seasonings in a mixing bowl.  Add the grated cheese and mix to combine.

4.  Once the pie crust has pre-cooked for 15 minutes, carefully remove it from the oven and spoon the onion/meat or veggie mixture into the crust.  Pour the egg mixture on top of this and allow the pie crust to cool enough so that you can carry it back into the oven (it’s very hard to do this with oven mitts on, so I usually just let it cool enough so I can touch it).

5.  Cook for approximately 45 to 50 minutes, or until it is no longer jiggly in the center and browned on top.  Allow it to cool for 10-15 minutes before eating.

___________________________________________________________________

Oven Fries Recipe

Ingredients

-1-2 large russet potato or garnet red yam per person
-1 1/2 tsp. cumin
-1 tsp. paprika
-2 tsp. chile powder (use less if you have a particularly spicy chile powder, mine is quite mild)
-1/2 tsp. onion powder
-1/2 tsp. garlic powder
– 1 tsp. salt
-1/4 tsp. pepper
-about 1/4 cup extra virgin olive oil per 4-6 potatoes, adjust according to your amount

Instructions:

1.  Preheat the oven to 375 degrees (if you’re making the quiche, these can cook at the same temp in the same oven, or cook the fries alone at a higher temp if you want a quicker fix – approximately 410 degrees for 25-30 minutes).

2.  Wash the potatoes/yams and cut them into 3/4″ thick matchsticks.  To do this, first cut them in half (hamburger style), then cut eat smaller piece in half (hotdog style), from there you can cut them once more hotdog style, if needed, and then cut them into thick matchsticks.

3.  In a small prep bowl, combine the spices and seasonings.

4.  Place the potatoes in a large ziplock bag, add the olive oil and spices and shake, shake, shake!

5.  Spread the potatoes onto a cookie sheet and cook for 45 minutes, or until they are crispy on the outside and soft inside.

Add a bit of fruit or a green salad and you’ve got the perfect weeknight meal!

Guest Blogger: Swedish Pancakes Recipe from Kristie of Above the Clouds

Blogging for us today is Kristie of Above the Clouds.  Kristie is a new blogger, but she has a lot to offer the craft world. 

Kristie’s newest obsession is clothes making, and I first found Kristie’s blog when she joined along in my Pattern Challenge.  Since then she’s made some adorable clothes that have got me all kinds of inspired!

Today she’s sharing with you her recipe for Swedish Pancakes, which would make a wonderful Mother’s Day Brunch.  I always love to order swedish pancakes when we go out to breakfast, but I have never tried making them myself!  They look absolutely delicious!  Thanks so much for sharing, Kristie!

 _____________________________________________________________________

Mother’s Day Brunch:  Swedish Pancakes by Above the Clouds


I’m so excited to be here on Come and See the Seitz!  My name is Kristie from Above the Clouds and I found Sarah through her Pattern Challenge.  She has inspired me with all her sewing projects, quilts and stylish clothes.  I love to sew and create and have recently become addicted to sewing clothes for my one year old daughter and myself.  Thanks Sarah for having me!  This is so fun. 

It’s time to celebrate Mom.  Why not do it with a delicious brunch with the whole family.  This recipe is a family favorite on my husband’s side and one that is asked for over and over. It’s like having desert for breakfast.  I’m going to share with you our family’s yummy recipe for Swedish Pancakes.

Ingredients:

  -6 eggs
  -1 1/2 cups flour
  -dash of salt
  -1 Tbsp sugar
  -2 1/2 cups milk
  -1 stick of butter (melted)

Directions:

1.  Beat eggs until lemon colored.

2.  Add flour, salt and sugar.

3.  Add milk IN THREE GROUPS. Batter will be very thin.

4.  Add melted butter.

5.  Let stand for 15 minutes.

6.  Pour 1/4 cup of batter into a hot skillet and tilt pan to thin out and make pancake shape.  When edges are set, flip pancake.

Makes APPROXIMATELY 30-35 pancakes. Serving size is about 3-4 per person or more for the hungry guys.

We like to scoop some fresh juicy strawberries and whip cream in side, roll them up and drizzle syrup on top.  I also like to eat them with just whip cream inside and syrup.  Yum!  

Be creative.  Fill them with your favorite fruit.  I originally had this with lingon berries which is more traditional, but a bit too tart for me. I’ve never tried it, but I bet scrambled eggs and ham would be delicious.

On this day, we had powdered sugar, bananas, chocolate chips, mixed berries (from frozen bag) and some fresh strawberries smashed with sugar.

Watch out! They’re so thin and scrumptious it ’s hard to stop eating them.

Enjoy and Happy Mother’s Day.

~Kristie

Butter Chicken (You’re Welcome)

Butter….this recipe is an homage to butter.  Julia loved you.  Paula Dean loves you.  And I love you.

Butter Chicken

This recipe came from Tasty Kitchen, the Pioneer Woman’s newest culinary collaboration project.

Serves 4.

Ingredients

  • 4 pieces Boneless, Skinless Chicken Breasts
  • 5 cloves Garlic, Minced
  • 1 teaspoon Salt
  • ½ teaspoons Black Pepper
  • ½ teaspoons Cayenne Pepper
  • ¼ teaspoons Ground Coriander
  • ¼ teaspoons Cumin
  • ¼ teaspoons Cardamom
  • 1 whole Lime, Juiced
  • 1 whole Onion, Diced
  • ¼ cups Butter
  • 1 can (14.5 Oz. Can) Tomato Sauce
  • 1 can (14.5 Oz. Can) Petite Diced Tomatoes
  • 1 pint Whipping Cream
  • 1 bunch Chopped Cilantro, to taste
  • Basmati Rice

Directions

Combine first 9 ingredients and marinate overnight [I only marinated 2 hours and it was still delish!].

Saute the onion in the butter until soft. Add marinated chicken and cook about 10 minutes. Add the tomato sauce and diced tomatoes. Cook for 30 minutes over medium-low heat with the lid on. Add the whipping cream (I have used light cream or half-and-half also) and cilantro just before serving over Basmati rice.  [After the chicken was cooked I removed it from the sauce, cut it into cubes and added it back to the sauce]

Greek Panzanella

I needed something to cut through the cold, wet and generally unpleasant winter, so I decided to make a Panzanella (Bread Salad).  They are so delicious and fresh and springy!  Here’s the recipe, from Ina Garten.

Greek Panzanella

Ingredients

  • olive oil
  • 1 small French bread or boule, cut into 1-inch cubes (6 cups) (I used sourdough and it was perfect)
  • Kosher salt
  • 1 english cucumber, unpeeled, seeded, and sliced 1/4-inch thick
  • 1 red bell pepper, large diced
  • 1 yellow bell pepper, large diced
  • 1 pint cherry or grape tomatoes, halved
  • 1/4 red onion, very thinly sliced in half rounds
  • 1/2 pound feta cheese, cut in 1/2-inch cubes
  • 1/2 cup calamata olives, pitted (optional, I don’t like olives so I left them out)

For the vinaigrette:

  • 2 large cloves garlic, minced
  • 1 teaspoon dried oregano
  • 1/2 teaspoon Dijon mustard
  • 1/4 cup good red wine vinegar
  • 1 teaspoon salt
  • 1/2 teaspoon freshly ground black pepper
  • 1/2 cup good olive oil

Directions

Heat 3 tablespoons olive oil in a large saute pan. Add the bread cubes and sprinkle with salt; cook over low to medium heat, tossing frequently, for 5 to 10 minutes, until nicely browned. Add more olive oil as needed.

Place the cucumber, red pepper, yellow pepper, tomatoes and red onion in a large bowl.

For the vinaigrette, whisk together the garlic, oregano, mustard, vinegar, 1 teaspoon salt and the pepper in a small bowl. While still whisking, add the olive oil and make an emulsion. Pour the vinaigrette over the vegetables. Add the feta, olives and bread cubes and mix together lightly. Set aside for 30 minutes for the flavors to blend. Serve at room temperature.

Enjoy!!!

How to Make Homemade Pizza

Giveaway:  There’s still time to enter the Allmodern.com Giveaway!  Don’t miss out on FREE stuff!! 

It’s no secret.  I love pizza!  It’s just the most comforting food.  Tomatoes, cheese, garlic, basil, bread….how could you lose with these ingredients?!  My husband and I make pizza at least once a week.  We make it entirely from scratch (aside from making our own cheese!), and you can use ingredients you probably already have in your kitchen!    

I’m going to share with you how to make our favorite homemade pizza: 


This recipe will show you how to make the above Margherita Pizza, from start to finish.  But don’t stop there!  The possibilities are endless, and I’ll include a couple of our favorite variations to try.  I’ll go into a lot of detail (probably more than you want or need), but what can I say, I’m passionate about pizza!   

A note on pizza stones and peels:  I cannot possibly over-stress my love for my Sur La Table pizza stone.  It stays in my oven at all times and I just cook all my food right on top of it.  It is not only incredibly important for giving you a perfect crust on your pizza, but it is also perfect for baking bread.  I know they’re a bit spendy, but Valentine’s Day is coming up!  You deserve it!  I also love this pizza peel.  If you plan to make a lot of pizza or bread, this will be an invaluable tool. 

Picture from Sur La Table

Making Homemade Pizza from Start to Finish

1.  Early that morning:  

  • Start a batch of Artisan Bread 
    .  Don’t freak out!  It’s the easiest thing ever.  You basically mix yeast, kosher salt, flour and water until combined, then leave it on the counter for 2 hours and it’s DONE!  No kneading, no proofing, just mix it and leave it (I was tempted to say, “set it and forget it!” but I’ll spare you).  The other awesome thing about this dough is that it stays in your fridge for up to 2 weeks, meaning you’re ready to make pizza again next week, if you get the urge (you will)! 
  • Make the tomato sauce:  Mix one 15 oz. can of tomato sauce with one 6 oz. can of tomato paste.  Add 1-2 cloves minced garlic, 1 Tbps. dried oregano, 1/2 Tbsp. dried basil, 1 Tbsp. sugar, 1 tsp. onion powder, and mix to combine.  DONE.  No need to heat or cook.  We’ve kept this in the fridge for up to about 2 weeks, and this amount easily makes 2-3 pizzas.

2.  Forty minutes before dinner: 

  • Prep your toppings. 
    • Tomatoes:  We’ve tried this with all sorts of tomatoes and they are all delicious!  One word of advice here, if you are using really juicy Romas or Vine Ripe tomatoes, we recommend removing some of the seeds and innards before slicing.  My personal favorite is using cherry or grape tomatoes.  Simply slice them in half and they are ready!
    • Cheese:  Anything goes here, people.  BUT, my favorite is definitely Fresh Mozzarella.  If you can find it where you live, and can afford to splurge a bit, there is absolutely no substitute.  Other great cheeses to use are:  shredded mozzarella, feta, goat cheese, parmesan, fontina, ricotta.  I wouldn’t recommend using a yellow cheddar here, it just doesn’t really go with the traditional Margherita pizza.  But, if it’s all you have, go for it!  If you’re using a log of fresh mozzarella, just slice it into 1/4″ slices.
    • Basil:  Fresh if you’ve got it.  Just give it a quick rinse and chiffonade.  If you don’t have fresh, I’d just skip this entirely.  There is dried basil in the sauce, so no need to be redundant.
    • Garlic:  If you love garlic (and I do!), mince up another clove or two.

3.  Thirty minutes before dinner: 

  • Turn your oven up to as HOT as it will go.  I’m not kidding here.  550 degrees is what we’re going for.  Before you do this you might want to make sure your oven is relatively clean (no pieces of food inside) or you’ll get a hot burned mess. 
  • Grab your dough and pull off about a grapefruit sized piece.  Quickly cloak the dough (in-depth instructions are in the dough recipe) and place it on a well-floured (use cornmeal also if you’re worried about the dough sticking) pizza peel.  If you don’t have a pizza stone, a floured or silpat lined cookie sheet will work.  If you’ve previously refrigerated the dough, let it sit for about 30 min. to come to room temperature.  If this is freshly made dough, you can begin rolling it out immediately.  Or, if you’re like me, grab your hubby and tell him to show you his superior pizza throwing skills. 
  • Once your pizza is rolled out into a circle (I would aim for about 15″ in diameter, but don’t get out the ruler, people…this is supposed to be fun!) you can get started with creating that beautiful a-pizza-pie.

4.  Ten minutes before dinner: 

  • Assemble the pizza:  Sauce on bottom, sprinkle the minced garlic, add the tomatoes and cover with cheese.  Lots of cheese.  You can never have too much cheese.  Leave the fresh basil for later.
  • Quickly open the oven, and carefully slide the pizza onto the hot pizza stone.  If you don’t have a pizza stone and are cooking this on a cookie sheet, just put that in the oven now.
  • Set the time for 10 minutes and don’t peek!  In ten minutes the dough should be cooked and the cheese bubbling.  If it doesn’t look ready, give it another minute or so and check again.
  • Remove from the oven and top with the fresh basil.  I love to give it a drizzle of extra virgin olive oil here too.  Let it cool!  Don’t cut into it right away, the juices from the tomato will make a huge mess!  5 minutes on the peel should do it and you’ll be ready to eat.  YUM!


Now doesn’t that look good?  And I told you it was easy!  

Looking for variations?  Here are a few of my favorites: 

  • Goat Cheese, Onion and Red Pepper:  Chop up a mixture of bell peppers (red, yellow or orange), yellow onions and red onions.  Saute in butter until nicely browned and caramelized.  Roll out your dough, generously cover in olive oil, sprinkle 2 cloves of minced garlic, add the onions and peppers, and top with a ton of goat cheese.  DELISH!
  • Prosciutto and Asparagus:  Remove the ends of a handful of asparagus spears.  Cut into about 3″ pieces and drizzle with olive oil and season with salt and pepper.  Roll out your dough and cover with either a basic tomato sauce or drizzle with olive oil and sprinkle minced garlic on top.  Add the prosciutto and asparagus spears and top with cheese (goat cheese or ricotta work great here, but so will mozzarella).  When the pizza is cooked, drizzle it with olive oil and a little balsamic vinegar.
  • Barbeque Chicken:  Roll out your dough and cover generously with a good quality barbeque sauce.  Top with cubed grilled chicken (store-bought will work), sautéed red onions and mozzarella cheese.  When the pizza is cooked, top with chopped fresh cilantro.
  • Green Pizza:  This is an homage to the most yummy pizza ever from Hot Mama’s pizza in Seattle.  Roll out your dough, top with basil pesto (store-bought is OK!).  Add a ton of feta and shredded mozzarella.  Simple!
  • My friend Dacia has a yummy looking Thai Pizza on her blog that I want to try.  It should work perfectly with this method!

If you decide to try this pizza, please let me know in the comments!  I’d love to hear how it went.  Also, please share your own recipes for pizza toppings.  I’m always game to try something new! 

Happy cooking!

Firstfruits

We just got back from vacation:  one glorious week in Pismo Beach, California.  I loved every second of it (except for the second when I dropped my camera and busted it on day 2 of the trip…!).

All week Levi and I were wondering how our little garden was growing.  Here’s what we came home to find:

garden vegies

And for comparison purposes, see the size of the marker….these are some huge zucchinis!

vegies

Here’s what’s for dinner tonight:

Smitten Kitchen’s Lemony Zucchini and Goat Cheese Pizza

I’d post a picture but Deb (Smitten Kitchen) won’t allow it…shame because those are some lovely pictures!  Find the recipe and salivating photos at the link above.

Until we get a new camera, the not-so-pretty cell phone pics will have to suffice.

Best Thing Since Sliced Bread

The best thing since sliced bread is…well…sliced bread!  

ArtisanBreadinFiveMinutesaD_3

I recently purchased this book, thanks to the recommendation of my friend Bethany, and since the day I bought it about 3 weeks ago, I have not once been without fresh baked bread when I wanted it.

The secret to this recipe is a high-moisture dough that can be refrigerated for up to 2 weeks.  You mix the ingredients together to create enough dough for four loaves, let the yeast do its thing for about 2 hours, and the dough is either ready to be baked or ready to go into the fridge for whenever you’re ready for some fresh bread.  Pull off enough dough for a loaf and bake it at a high temperature (I use a pizza stone).  And this stuff is DELICIOUS !  This bread is a perfect mixture of crusty and soft, light and airy, yet thick and hearty.  It is infinitely adaptable:  we’ve already used the same dough to make pizza, bacon and eggs in toast, naan bread and several varieties of the traditional loaf (sandwich bread, rustic boule, ciabatta, baguette).  

My husband likes to tell me that I should be on an infomercial, because I have evangelized this book to so many people, but it is just too good not to share!  I hope I’ve convinced you to buy the book, because, seriously, with just 5 minutes of active time (the rest of the time is just letting the dough rise/settle) you can have a delicious, homemade artisan loaf of bread whenever you want one!

mosiac

Ok, so I know you’re all dying for the recipe.  You can find it here, but support the authors and buy yourself a copy!

A Baby Shower, A Baby and A Small Project

A couple of weeks ago I hosted a baby shower for my dear friend, Dacia.  My aunt opened up her lovely home to us, which was the perfect setting for a spring shower.  We had a great time, the food was splendid, the attendants were gracious and apparently it was so exciting for for my friend that it made the baby arrive sooner!  

IMG_3422

My friend is a vegetarian, so on the menu was balsalmic vinegar and olive oil marinated grilled vegetables (asparagus, portobello mushrooms, onions, peppers and zucchinis), creamy baked polenta with soft cheeses and topped with sauteed onions and peppers (served with crusty bread), curried cream cheese dip (served with wheat thins), and Sahale mixed nuts (to die for, you can get them at Costco).  

mosiac2

We drank mojitos (both virgin and regular!) and indulged in chocolate covered strawberries and a rich, flourless chocolate cake for dessert.  With my aunties help, we threw quite the fun party!

IMG_3424

As I alluded to above, my friend gave birth on Sunday (a week before her due date) to a wonderfully sweet and precious little boy!  My husband and I will be the godparents and we couldn’t be happier!  

Now I am just waiting for my sister and brother (who recently moved to Denmark and are due with their first baby on Sunday) to tell us that my nephew has been born!  Come on, little guy, hurry up!

This is such a fun time of babies, babies and more babies, but I’m telling ya, all this talk of babies is certainly making me a bit anxious for my turn!  It sure would be fun, but I know we’ve got some waiting to do.

We moved (across the street!) this past weekend, so I haven’t been able to do much in the way of crafting lately, but what I am excited about is that I now have a HUGE and functional craft room!  I will be posting with pictures as soon as it is complete (it’s almost there).  I am so excited to begin crafting in my new space.  The one thing I did make a couple of weeks ago was this sweet camera/iPod case for my friend’s birthday.  That’s all for now!

mosiac3

Click Photo to Enlarge

Still Sewing Away…

I haven’t stopped sewing!  The last couple of weeks I’ve been slowly making clothes for my niece, Maddie (just turned one!).  Making clothes for little ones is so much fun.  You hardly need any fabric and it goes so quickly.  The only problem was that I didn’t use any patterns and I attempted to size them off measurements alone.  This method actually worked pretty well, although I definitely had to make some adjustments after Maddie tried them on.  

mosiac5

I love this shirred dress I made for Maddie.  It looks so cute on her!  Stay tuned for a possible Tutorial plus pictures of Maddie modeling her outfits.

mosiac6

I made the most simple jean skirt for Maddie.  I took a pair of my husbands old jeans (these are 7 For All Mankind jeans that got holey) and keeping the original leg hem, I cut about 12″ up from the hem.  I used fold-over elastic (thanks Angry Chicken!) to create an elastic waist out of the old jean leg.  Then, just to finish it up I added a white trim to the bottom hem.  That’s it!

img_3224

Onto food…here’s a recipe for my all-time favorite burger.  It is so easy to make and tastes better than any burger you will order at a restaurant (seriously!).

mosiac7

Gorgonzola Burger (4 servings)

1 1/3 lb lean ground beef
3 tbsp. good barbecue sauce
1 glug (technical term, guys) worcestershire sauce 
1/2 tsp. garlic powder
couple pinches kosher salt
freshly ground pepper 
1/4 cup crumbled gorgonzola 


Garlic Aioli (recipe follows)

3 tbsp. mayonnaise
2 tsp. lemon juice
2 cloves garlic, minced
1/2 tsp. dijon mustard 
1 tsp. fresh basil, finely minced 

4 english muffins


In a standing mixer (or in a bowl) combine the first six ingredients.  Mix to thoroughly combine, but don’t overwork the meat. Add the gorgonzola and mix briefly.

Form the meat into 4 evenly sized patties and immediately refrigerate for at least 10 minutes (up to a day ahead).

Prepare your grill pan or outdoor barbecue to a high heat.  If using a grill pan, lightly grease with olive oil.  Grill the burgers until they are cooked through (no pink, time will vary depending on your grill).

Toast the english muffins and top with the garlic aioli.  Other condiments could include fresh tomato slices, basil, or crisp lettuce (although I prefer this burger very simple, it will have plenty of flavor!).  Top each muffin with a gorgonzola patty and enjoy your gourmet meal!