My dear friend, Bethany, has opened a new Etsy shop, City Thistle! She’s sellling absolutely beautiful jewelry and is hosting a giveaway on her blog to celebrate her new shop!
To help Rae at Made By Rae and Dana at MADE Celebrate the Boy this month, my oh-so-talented sister is having a giveaway for one of her precious flat cap golfing hats from her Etsy site, Kissed by Kate. Since she doesn’t currently have a blog, you can enter this wonderful giveaway here on Come and See the Seitz.
The giveaway is for 1 custom made-to-order hat. She will work with you to decide the size, color, texture, and fabric you want – it can even be made as an adult size.
Giveaway Rules:
1. One entry per person.
2. Just comment on this post to enter the giveaway. Make sure you leave your email address in your comment (or have your email address visible in your profile).
3. The winner will be randomly selected.
4. Kate will ship internationally.
5. The Giveaway will run from Feb 19-midnight through the end of the day on Feb 20.
Good luck!!!
UPDATE: Comments closed! The winner will be announced later today. Thanks for all your wonderful comments!!
Congrats, Shorty! I will email you about how to claim your prize later today. And to everyone who didn’t win…fret not! Jamie from CSN stores has made me a “Preferred Blogger,” meaning I’ll have the option to do many more giveaways in the future, perhaps every other month! I’ll try to throw in some fabric/sewing related ones as well, because I’m pretty sure that’s why most of you are here!
EDIT: This giveaway is now closed. Please come back in a couple of months for another giveaway from CSN stores!!
Hi Friends!
I’ve got a giveaway for you guys today coming from the lovely folks at CSN stores. These guys sell practically EVERYTHING!! From wall sconces and shoes to cookware and baby toys…you can find almost anything you could possibly need or want at one of their online stores!
The winner of this giveaway will receive a $50 gift certificate to be used at any of their 200+ stores.
Here are some of my favorite CSN picks for summer (all under $50!):
Spreading the word! Another entry for blogging, tweeting or facebooking about this giveaway. Just leave the link in your comment.
The fine print:
I’m so sorry to my international readers, but this giveaway is only open to those with US and Canada addresses.
I will keep this giveaway open until June 16th.
In the next couple of weeks I’ll have a review to post of a product from CSN. I’m thinking about getting a small bookcase to house my ever-growing fabric stash. I’m so excited!
Thanks for all the love on the Panty Tutorial. I’m so happy to hear that many of you are interested in trying it! Please, please, if you do give it a shot, I would love to hear how it turned out/see pictures!
And now, the winner of the jersey and stretch lace is……Bethany!!! Which is TOTALLY awesome because I work with Bethany’s husband (Cameron) and she is super great and an incredibly talented baker! Although she needs to post on her blog more…come on, Bethany, get to it!
Bethany’s comment makes me laugh because Cam is known for going to extreme lengths for our work’s “Biggest Loser” contest. He is excellent at losing weight in a very unhealthy way. And he knows it’s unhealthy. So don’t bother telling him so.
Anyways, congrats to Bethany! Some fun jersey and stretch lace are coming your way!
On another note, I finished the shift dress inspired by this J Crew beauty. It’s adorable! I love it! Here’s a really crappy camera phone sneak peek:
I made it from an IKEA duvet cover (cotton sateen) that I bought awhile back with the intention of making it into a futon cover. I like this use much better, and I still have tons of fabric leftover. I’ll post more pictures soon.
Finally, I have to say Happy Birthday to my wonderful husband. You are the best, babe! And I love that you were born on St. Patty’s Day…it is so fun!
This tutorial will take you, step by step, through the process of making underwear that fit you perfectly and look great too. You can click on any of the photos in each step to enlarge them (which will make reading the text on some of them much easier). Please use this pattern for personal use only, and feel free to link back to this post.
As always, I encourage you to Contact Me if you have any questions throughout the process, I love to hear from you!!
Supplies:
1/2 yard of jersey fabric (up to 1 yard for larger sizes) – It is really hard to find cute jersey, so feel free to repurpose old t-shirts, pajamas or whatever jersey you can find!
Start with your favorite pair of underwear that have seen better days, these will be referred to as the “pattern underwear”:
1. Cut off elastic waistband and elastic legbands from the underwear (set these aside for later use):
2. Cut off lining (no need to use a seam ripper):
3. Cut along sides of panties (follow the seam lines).
4. Cut along bottom seam to create 3 separate pattern pieces (Note: some underwear will differ from mine below, if that’s the case you may need to add a 4th pattern piece and adjust the steps accordingly):
5. Find the center line of the front and back pieces and mark it in pen. Fold the pattern underwear in half along this seam. Fold your pattern paper in half and match fold lines. You will be tracing your pattern on the fold so as to create a symmetric pattern piece:
6. Before cutting, determine how stretchy your jersey is. If it has about the same stretchiness as your pattern underwear, trace your pattern to the same size as the pattern underwear, but add a ½ inch seam allowance all around. If it has less stretch than your pattern underwear, consider tracing your pattern a bit larger than your pattern underwear (also add ½” seam allowance). If it has much more stretch than your pattern underwear, consider tracing your pattern a bit smaller than your pattern underwear (also add ½” seam allowance).
7. To create the lining pattern piece, make your pattern the exact same size as the lower part of the front piece, yet keep the length the same as the piece you cut from your pattern underwear.
You have now created your pattern!
Cut Pattern from Fabric:
8. Cut out your pattern pieces from your fabric – take care to place the patterns on the fabric so that they will stretch the most from side to side rather than top to bottom. I use a rotary cutter for this, but if you are using scissors, be sure to pin well before cutting. For the sake of hygiene, if the jersey fabric you are using for the panties is not 100% cotton, you should cut the lining piece out of fabric that is.
9. At this point you can serge with a rolled hem around all of the pieces, but this is not necessary, since jersey will not fray and all edges will be covered by the lace. If you do decide to do this, do not yet serge around inside leg edges.
10. Finish the short end (marked in orange below) of the lining piece as this will be exposed on the inside of the panties. You can do this by serging, or by folding down a narrow hem and stitching it in place:
Construct the Panties:
11. Place your pattern pieces on your workspace in the following order, lining the bottom edge (as pictured below):
-Front Piece, right side up
-Bottom Piece, right side down
-Lining, right side down, long edge on bottom
Stitch along the bottom edge (marked in orange) using a ½” seam allowance. Use a stretch stitch or a zig zag stitch.
12. Fold lining up towards front and iron it down:
Using a zig zag stitch, sew down the lining to the front side on the two sides (marked in orange). Alternatively, you can hold the lining in place by serging the leg edges, if you like:
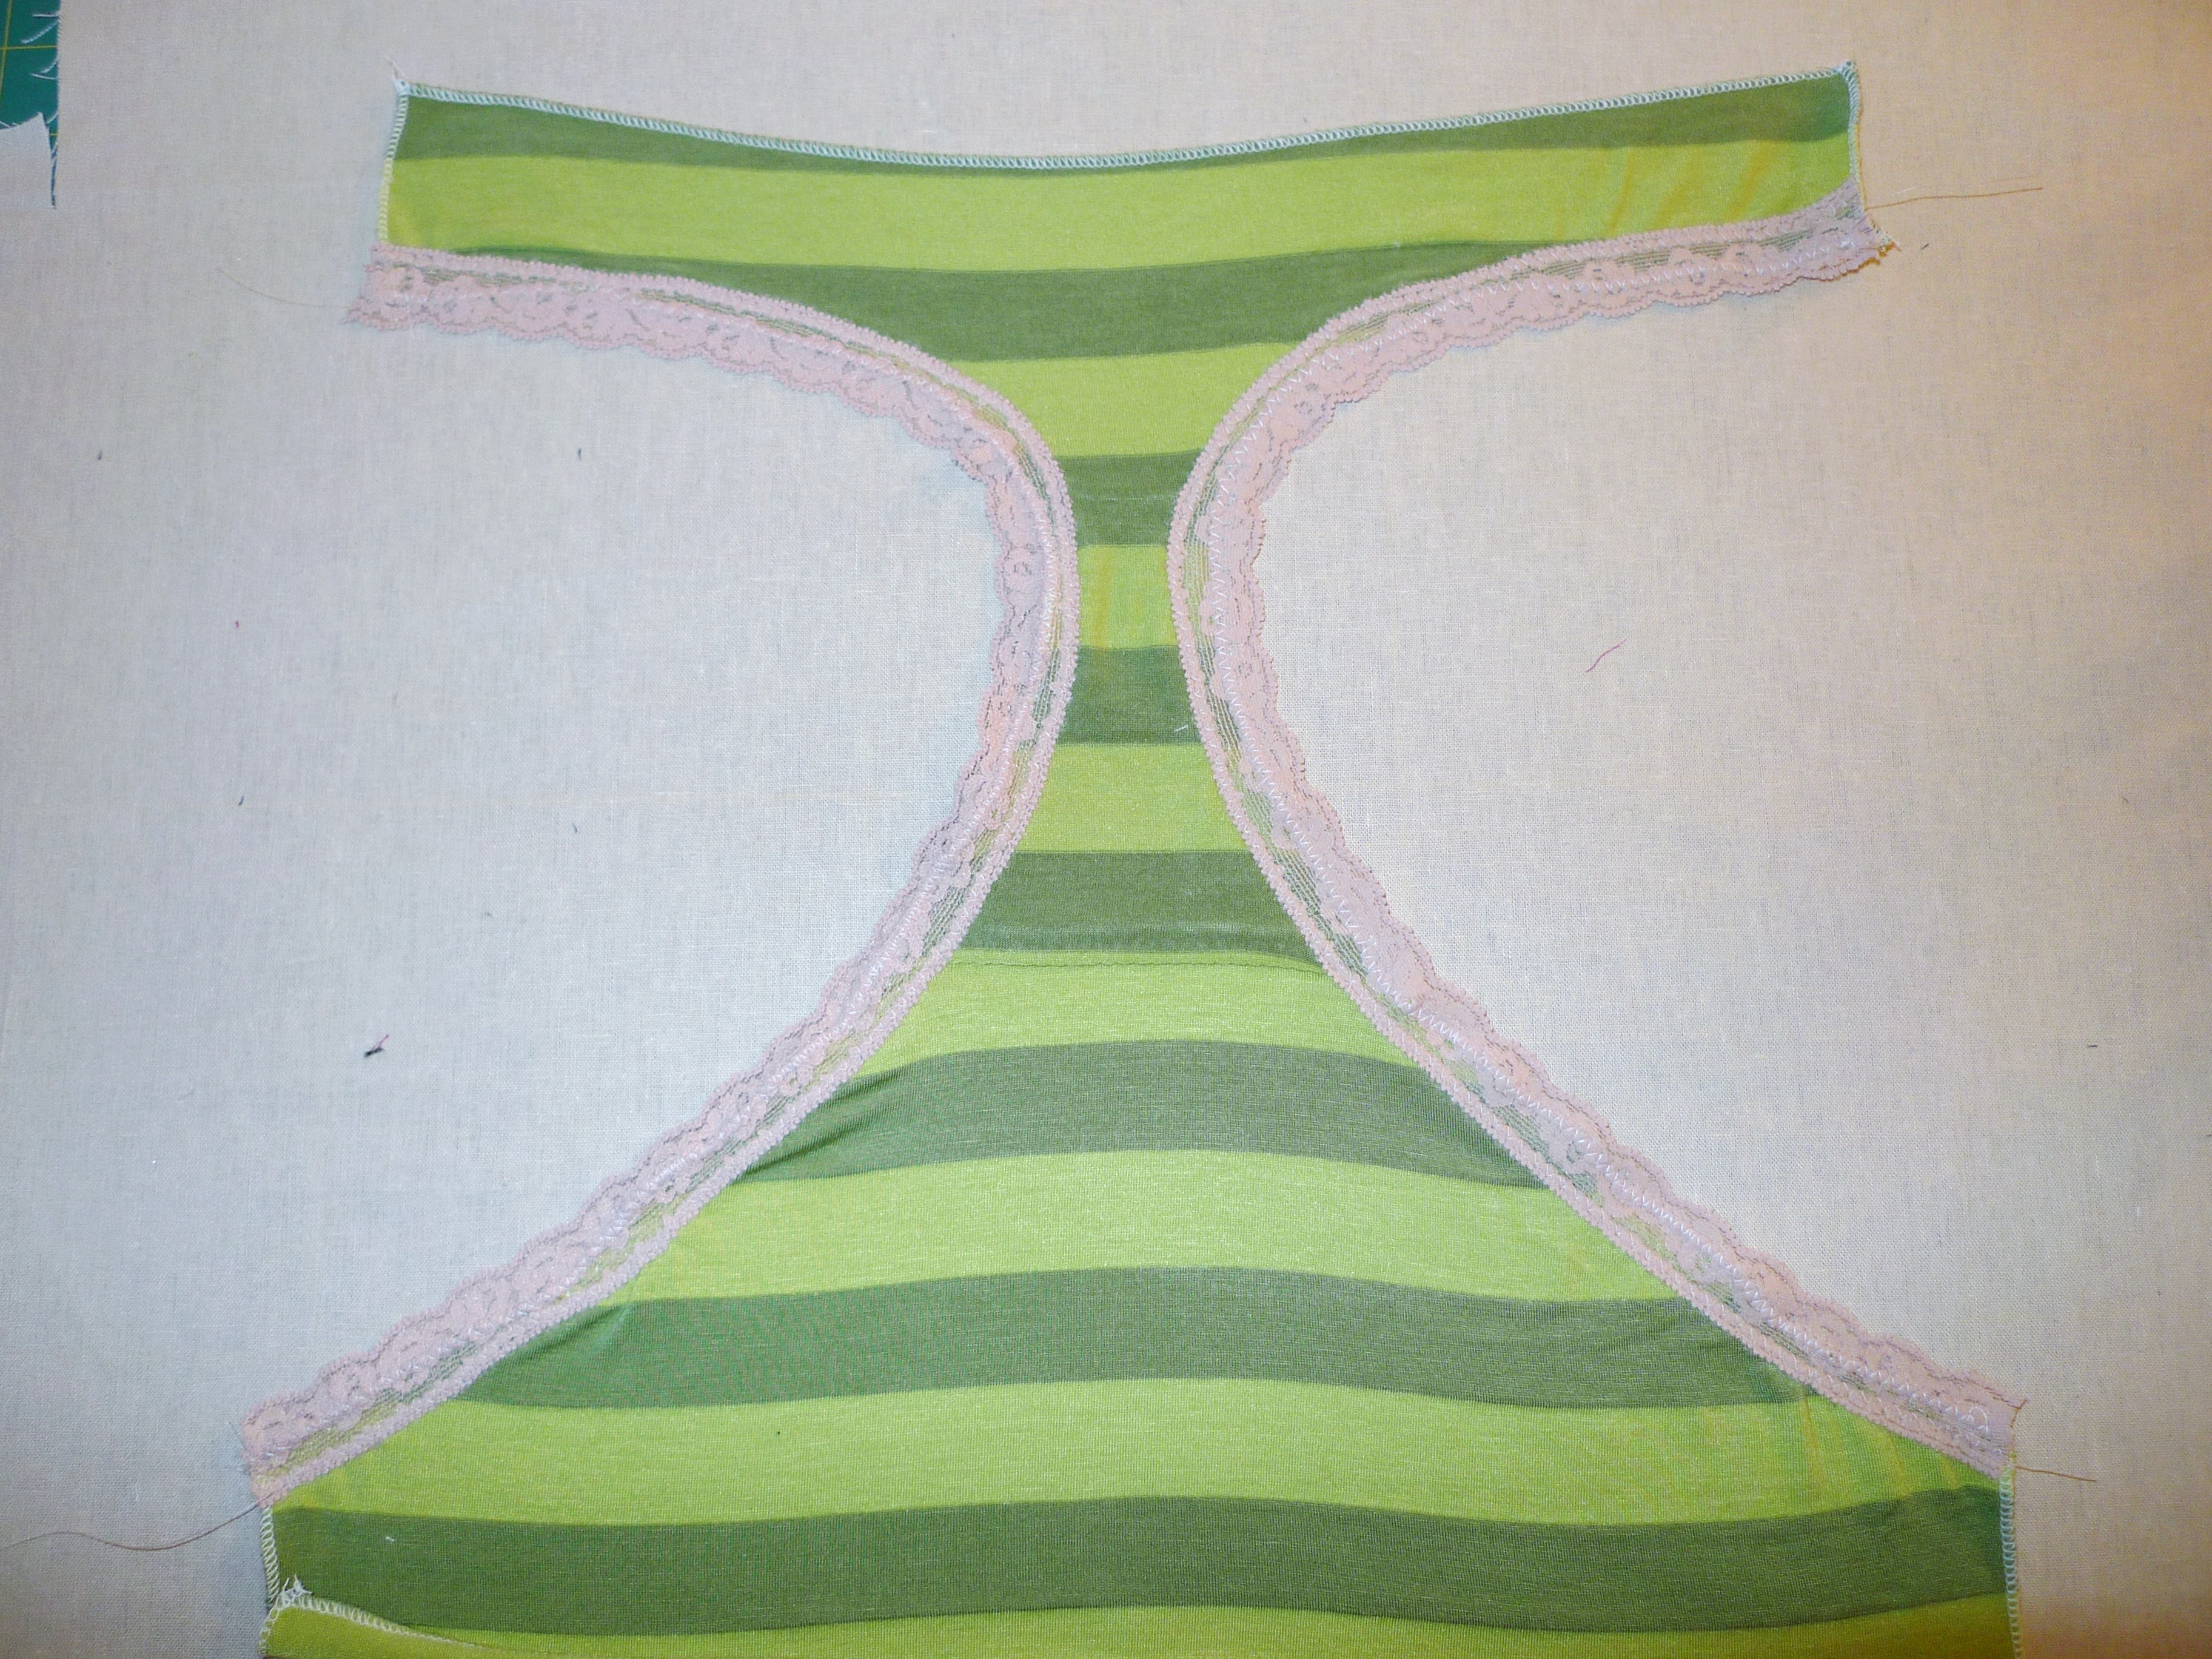
13. Lay your stretch lace trim out next to the leg band of elastic that you removed from your pattern pieces. Cut your lace trim to the same length:
14. Pin the two ends of the lace to both ends of one leg opening, with the lace sitting directly on top of the right side of the fabric. Pin the center of the lace to the center of the seam:
15. Using a zig zag stitch, stretch the trim so that it sits straight onto the fabric (see my demo video posted below). You will be stitching it in place in two places: first along the innermost edge of the lace and then on the part of the lace that touches the raw edge of the fabric (this is made more clear in the video):
Here is a video where I demo how to sew the stretch lace onto the underwear:
16. Repeat for the other leg:
17. Lay your stretch lace trim out next to the waist band of elastic that you removed from your pattern pieces. Cut your lace trim to the same length:
18. Pin the two ends of lace to both ends of the back piece waist line, and once in the middle, with the lace sitting directly on top of the right side of the fabric:
19. Using a zig zag stitch, stretch the trim so that it sits straight onto the fabric (see video above). Again, you will be stitching it in place in two places: first along the innermost edge of the lace and then on the part of the lace that touches the raw edge of the fabric.
20. Repeat for the front waist band:
21. Bring the front and back pieces together, right sides together. stitch along the two side seams (marked in orange), using a ½ inch seam allowance. If your front and back pieces aren’t exactly the same size at the sides, that is OK, just stretch the smaller side to make them even.
22. Turn them inside out and admire your adorable new panties! Now you know how to make underwear! Be sure to keep your pattern and make any adjustments needed so that the next time you make them they will be just as lovely.
_________________________
CLOSED: Giveaway!!!!
I’m going to giveaway enough jersey and matching stretch lace trim for one winner to make a pair of these panties! Just leave a comment to be entered (if you’ve already commented then you have entered). You can receive one more entry for following my blog or letting me know you already do (leave another comment). I’ll pick a winner next Wednesday, March 17th. Good luck!!
I’ve picked the two winners of the adorable mini-purses made by my sister, Kate.
The winners are….Dana!!!
And….Kelly O!!!
Congrats! I’m emailing you both right now. Thanks so much to everyone else who commented and entered this giveaway. And thanks, of course, to my sister Kate for all the lovely inspiration!
I finished #4 in my Pattern Challenge: this Simplicity shirt. It turned out so so cute! I love it! I will post about it later this week when I can get some decent photos taken. Yay for patterns working out as they should!
Over the weekend, my sister (who lives 2 states away from me in California) threw the cutest party for my niece and I asked her to share about it with all of you! My sister and I have such similar taste when it comes to all things crafty, and I hope that someday we can live close to each other and start a sewing business together!
Read on to hear from my sister, Kate, about Maddie’s party and be sure to check out the bottom of this post for a little giveaway!
________________
When I was thinking about what theme I wanted for my daughter Maddie’s 2nd birthday, I immediately thought of all the things she loves such as Dora, Mickey Mouse, and Winnie the Pooh. Call me selfish, but I just couldn’t stomach another character themed birthday-filled day… So what else could I think of that would not only please Maddie but would meet the approval of her mother who loves all things pink, girly, and sweet? How about candy? Lots and lots: m&m’s and reese’s, gummy bears and lollipops, cookies with pink frosting and mini cupcakes. Let’s call it Madelyn’s Sweet Shoppe, and embrace the little kid in all of us. Forget our New Year’s Resolution diets; let’s utterly and completely indulge all day!
I found these amazing labels from eatdrinkchic, and fell in love with the pink and white stripes and pretty much everything else for the ice cream party. I thought this would make a perfect sweet shoppe color pallet too.
I made all the girls little mini purses and the boys draw-string pouches with left-over fabric I had. They were super easy and quick to make, and so adorable on them!
Sammy was the life of the party as usual!
Maddie (right) with her best friend Addie, drinking margaritas, engaging in deep and meaningful conversation. To make the margaritas, just mix 1 bottle of Jose Cuervo (non-alcoholic) margarita mix with ice and lime juice. Blend with fresh strawberries for a fun pink twist.
Here are the girls in front of a fun background I made for taking pictures. I used a tri-fold cardboard display, and painted on the pink and white stripes. The flags were cut out with felt and I glued on flowers in the window box.
We played “Pin the Cherry on the Ice Cream Cone,” which the kids loved! You can see the board I made in the background of the picture above.
I cut out letters for the Happy Birthday banner using adorable Amy Butler paper.
All the kids had a blast, and loved picking out their candy at the end and putting it in their candy purses and bags (with their mother’s hovering over them trying to limit the amount their kid grabs, all the while shooting me evil looks!).
________________
Thanks, Kate! I so wish I could have been there! That’s Kate, on the right, right holding my adorable nephew, Sammy. Natalie, on the left, was the extraordinary baker behind the gorgeous mini cupcakes. I heard they were delicious!
________________
Kate is giving away two of these mini-purses to two lucky readers!
Just leave a comment on this post letting me know what your favorite kind of candy is! I’ll choose the winners next Monday, March 1st.
Kari from Handmade Mommy who would love to pick out some Wall Art from All Modern.
Congrats, Kari! Looks like you’ll be able to get that wall art for your home! Kari has a super cute blog, so go check it out now while you writhe in jealousy!
Kari, I’ll send you an email in a moment so you can choose your prize up to $50. Can’t wait to see what you get!
___________
A quick update on the Pattern Challenge. We now have 19 official members, so this will be fun! I finished the Jersey Dress (#2 on my Pattern Challenge) and will post about it tomorrow. WOW, this thing was a nightmare! You’ll also get to see how the finished product looks nothing like the pattern! I made a ton of modifications…but it turned out cute!


