


This tutorial will take you, step by step, through the process of making underwear that fit you perfectly and look great too. You can click on any of the photos in each step to enlarge them (which will make reading the text on some of them much easier). Please use this pattern for personal use only, and feel free to link back to this post.
As always, I encourage you to Contact Me if you have any questions throughout the process, I love to hear from you!!
Supplies:
- 1/2 yard of jersey fabric (up to 1 yard for larger sizes) – It is really hard to find cute jersey, so feel free to repurpose old t-shirts, pajamas or whatever jersey you can find!
- 2 yard of stretch lace trim (up to 2.5 yards for larger sizes)
- 1 pair of retired cotton (jersey) panties to become your pattern
- 1 small piece of 100% cotton fabric for lining
- ballpoint needles (for sewing through jersey)
- thread to match
Create the Pattern:
Start with your favorite pair of underwear that have seen better days, these will be referred to as the “pattern underwear”:

1. Cut off elastic waistband and elastic legbands from the underwear (set these aside for later use):

2. Cut off lining (no need to use a seam ripper):

3. Cut along sides of panties (follow the seam lines).
4. Cut along bottom seam to create 3 separate pattern pieces (Note: some underwear will differ from mine below, if that’s the case you may need to add a 4th pattern piece and adjust the steps accordingly):

5. Find the center line of the front and back pieces and mark it in pen. Fold the pattern underwear in half along this seam. Fold your pattern paper in half and match fold lines. You will be tracing your pattern on the fold so as to create a symmetric pattern piece:

6. Before cutting, determine how stretchy your jersey is. If it has about the same stretchiness as your pattern underwear, trace your pattern to the same size as the pattern underwear, but add a ½ inch seam allowance all around. If it has less stretch than your pattern underwear, consider tracing your pattern a bit larger than your pattern underwear (also add ½” seam allowance). If it has much more stretch than your pattern underwear, consider tracing your pattern a bit smaller than your pattern underwear (also add ½” seam allowance).
7. To create the lining pattern piece, make your pattern the exact same size as the lower part of the front piece, yet keep the length the same as the piece you cut from your pattern underwear.


You have now created your pattern!
Cut Pattern from Fabric:
8. Cut out your pattern pieces from your fabric – take care to place the patterns on the fabric so that they will stretch the most from side to side rather than top to bottom. I use a rotary cutter for this, but if you are using scissors, be sure to pin well before cutting. For the sake of hygiene, if the jersey fabric you are using for the panties is not 100% cotton, you should cut the lining piece out of fabric that is.

9. At this point you can serge with a rolled hem around all of the pieces, but this is not necessary, since jersey will not fray and all edges will be covered by the lace. If you do decide to do this, do not yet serge around inside leg edges.
10. Finish the short end (marked in orange below) of the lining piece as this will be exposed on the inside of the panties. You can do this by serging, or by folding down a narrow hem and stitching it in place:

Construct the Panties:
11. Place your pattern pieces on your workspace in the following order, lining the bottom edge (as pictured below):
-Front Piece, right side up
-Bottom Piece, right side down
-Lining, right side down, long edge on bottom
Stitch along the bottom edge (marked in orange) using a ½” seam allowance. Use a stretch stitch or a zig zag stitch.

12. Fold lining up towards front and iron it down:

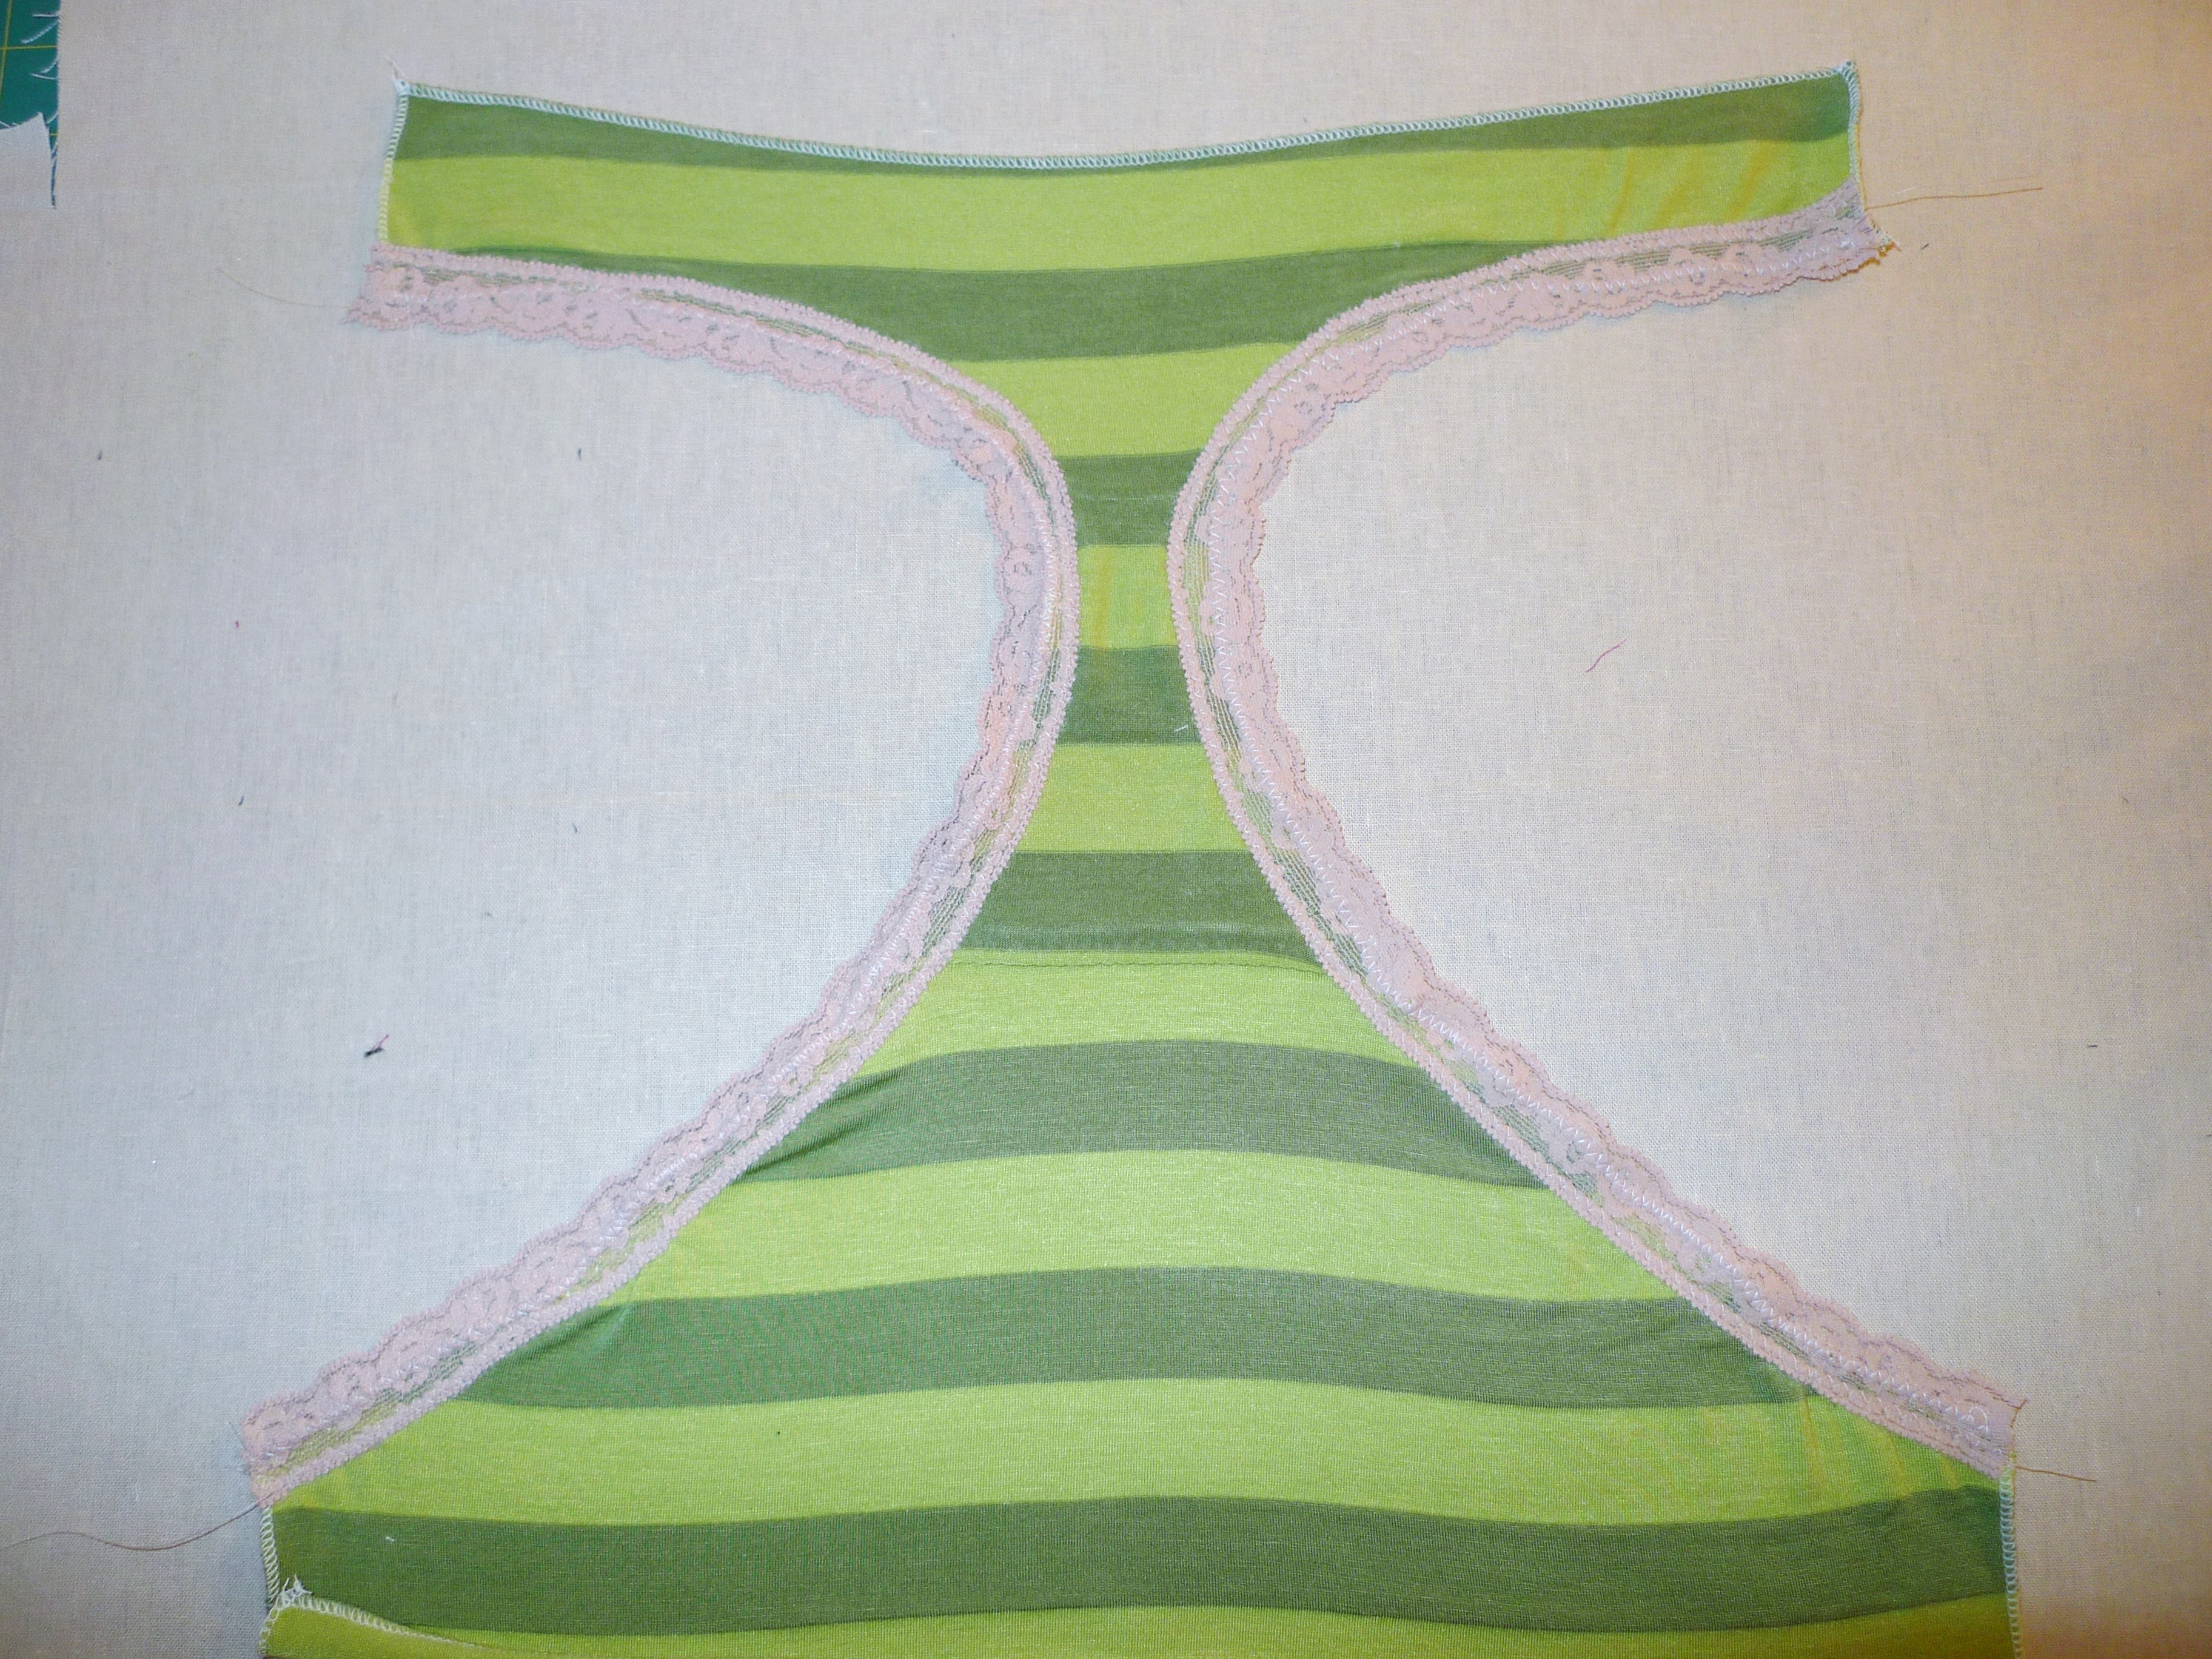
Using a zig zag stitch, sew down the lining to the front side on the two sides (marked in orange). Alternatively, you can hold the lining in place by serging the leg edges, if you like:

13. Lay your stretch lace trim out next to the leg band of elastic that you removed from your pattern pieces. Cut your lace trim to the same length:

14. Pin the two ends of the lace to both ends of one leg opening, with the lace sitting directly on top of the right side of the fabric. Pin the center of the lace to the center of the seam:

15. Using a zig zag stitch, stretch the trim so that it sits straight onto the fabric (see my demo video posted below). You will be stitching it in place in two places: first along the innermost edge of the lace and then on the part of the lace that touches the raw edge of the fabric (this is made more clear in the video):

Here is a video where I demo how to sew the stretch lace onto the underwear:
16. Repeat for the other leg:

17. Lay your stretch lace trim out next to the waist band of elastic that you removed from your pattern pieces. Cut your lace trim to the same length:

18. Pin the two ends of lace to both ends of the back piece waist line, and once in the middle, with the lace sitting directly on top of the right side of the fabric:

19. Using a zig zag stitch, stretch the trim so that it sits straight onto the fabric (see video above). Again, you will be stitching it in place in two places: first along the innermost edge of the lace and then on the part of the lace that touches the raw edge of the fabric.
20. Repeat for the front waist band:

21. Bring the front and back pieces together, right sides together. stitch along the two side seams (marked in orange), using a ½ inch seam allowance. If your front and back pieces aren’t exactly the same size at the sides, that is OK, just stretch the smaller side to make them even.

22. Turn them inside out and admire your adorable new panties! Now you know how to make underwear! Be sure to keep your pattern and make any adjustments needed so that the next time you make them they will be just as lovely.

_________________________
CLOSED: Giveaway!!!!
I’m going to giveaway enough jersey and matching stretch lace trim for one winner to make a pair of these panties! Just leave a comment to be entered (if you’ve already commented then you have entered). You can receive one more entry for following my blog or letting me know you already do (leave another comment). I’ll pick a winner next Wednesday, March 17th. Good luck!!


This is awesome!!! You even have a YouTube video?!
Yay, thanks Sarah! I’ll have to give this a try. Yours are so cute it makes me want my own!
Love the tutorial! Seriously guys, it is so easy! I’ve made 3 now. The first took about an hour, and then the next about 30 minutes each including making the pattern. I tried a few different underwear patterns to see which I liked best. I definently had to adjust for stretch. The fabric I used wasn’t very stretchy so I added about an inch to the waist. Thanks Sarah! Victoria’s Secret, watch out!
Love this!
Victoria secret, watch out….lol, U funny girl. It’s a very lovely and easy to make…Oh my Lord. So long Vicki Secret.
oooh, fun! i need to get my hands on some awesome stretch lace… any tips?
Hey Ramona! YES! There is actually a link in the “supplies” list of the tutorial for the “Stretch Lace Trim” that I used. I bought it from laceheaven.com and it worked perfectly! Good luck!
oooooooh…… LOOOOOOVE all the colors!!!!
thanks for the awesome tutorial! 🙂
omg you make this look so easy!
Wow! Great tutorial!!!
This is fantastic! Thank you for the detailed and clear instructions with photos! 🙂
i just made my 1st panty. thanks
this is a great tute! amen to Victoria Secret watch out!
I’ve been asking my friend to make me a pair of hot pant panties forever. Now I can just do it myself! Woot! thanks!
You have no idea how excited I am about this tutorial! (perhaps a bit too excited? Nah.) This is great. Thank you!
You made that look so easy I think I just might make some too!
Wow! I cannot wait to try this on a pair of my old favorites that I can’t fine more of anymore!
This is an awesome tutorial. I’ve been searching for underwear tutorials but, as a novice sewer, I found a lot of them hard to follow. This is not the case with yours.
I’m so pleased I decided to follow Sew Mama Sew on Facebook, else I’d never have found this. Thanks!
I love this! But then, I love having more underwear than I could ever need. This is, naturally, right up my alley.
They don’t fit if they’re right up your alley, sorry, it had to be said 😉
And a great tutorial!
What a great tutorial! I’ve been wanting to make my own panties for a while now. I’m definitely going to share this with my friends!
I’m so glad I’m not the only one making my own underwear! I just made a pair for my potty training toddlers as well.
Oooh that’s so awesome! Thanks for sharing! And thanks for the giveaway! 🙂
nice! I have been wanting to make panties- this is perfect!!!!
So cute! I am gonna have to give that a whirl. Thanks!
Well isn’t that something! Can’t wait to give it a try! I’ll be adding my name to your following as well!
Oh my goodness. You have no idea, I’ve been plotting making my own underwear for so long now!! Just haven’t gotten around to it, and my favorite ones are SO threadbare, because I refuse to buy them ever again–I am SO tired of them falling apart after a couple months. 🙂 LOVE this!
oh oh I hope I win! I love this idea!! ❤ thanks for sharing a fantastic tutorial!!
These are too darling. I have never made my own underwear but you make it look easy.
Nice! Thanks for the instructions!!
This is fantastic! I love the idea of using an old shirt to recycle the fabric. Thanks for the great tutorial.
These are so cute! I’ve seen other people make them and I want to give it a try too. Now to find a pair of undies to retire….
These are so adorable! I can’t wait to try this. Thanks so much for the awesome tutorial!
Wondering if I can make it if I go really rrreeeaaaalllly slow through the instructions. I hate it when my favorite style gets tired and I can’t find some to replace them. 😉 Thanks!
I am differently going to add this to my list of “thing to make myself” i just got this fabulous pair panties that fit just right and thought i wish i had more…this may be the answer.
This is a wonderful tutorial. My only difficulty is that I like boy shorts the best but have some difficulty finding ones that would be good to make a pattern out of. Any thoughts?
Hey Rebecca!
I think this same exact technique can definitely be used for making boy shorts! I did a quick search on American Eagle’s website (which is my favorite place to buy comfy undies that fit perfect) and found these: http://www.ae.com/aerie/browse/product.jsp?catId=cat520011&productId=prod5380087. They would be perfect for making a pattern because it looks like they are constructed from 3 main pieces, just like mine are (a front, a back and a lining). I would encourage you to just go for us and start cutting them apart following the seam lines. You should then be able to create a pattern by adding your seam allowances and sewing it back together as my tutorial instructs. Good luck and let me know how it goes!
Thank you for making it look so simple. I can’t wait to try it out.
These are so cute! Just think, never having to buy underwear again–now all we need is a bra-making tutorial…
😉
Haha, sorry I can’t provide that! At least not yet….maybe some day!
I LOVE the idea. How many of us have favorite underwear that’s worn, and you can never seem to find another pair that’s as comfortable?!
How fun is this! Thanks for the simple tutorial. I can’t wait to try this.
Brilliant…just brilliant!
Thanks! I think I’ll have to try this!
Thanks for posting this!
Wow I may have to give this a try, much better than the $9 to $16 I spend now.
Wow! Thank you so much for this great tutorial! I will definitely have to make these.
You are so very clever! Thank you I will have to give it a go, I may even try it for my kiddo’s.
Wow – this is one of the most creative craft-blog posts I’ve seen! So glad I found your blog through One Pretty Thing.
I would love to try this!
Brilliant! Thanks so much for this. I love that you use your own favourite undies for a pattern. I’m going to try this out this afternoon.
Thank you SOOO much for your amazing tutorial! Can’t wait to try it out this weekend.
woohoo! new undies, yeah! what gal doesn’t ♥ that!!??!!
I have these awesome panties that are beginning to wear out and I can’t find the same type now. You may have found a solution to my perfect pantie problem! Thanks!
So awesome!
Wow! That’s great!
This is something I have been wanting to try. Now that I’ve found your tutorial, I will. Thank you.
I’m a follower! 🙂
wow, how fun! love the idea of making more of a favorite pair!
Ok, ok. I’ve been afraid of doing this, but your tutorial makes me feel less afraid. I’ll try it this week!
Thanks for the tutorial! Cam has tons of old t-shirts from his uber-skinny days (even accounting for the recent weight loss) so I think I’ll be poaching them to make panties!
I already follow your blog, too!
Thnking you so much for the awesome giveaway.
I find as a mum Im the last on the list, if it’s sewing or buying of any clothes.
It’s so nice to see a pattern for women, and to have a giveaway with it.
Good luck all.
I’ve seen a couple other tutorials on making knickers but none inspired me. This, however, actually makes me want to go out and buy some jersey material and stretchy lace.
Coincidentally, as Autumn’s approaching, there are some lovely new jersey fabrics hitting the fabric stores now…at last I have a reason to buy some. 😉
Thanks so much for sharing!
I’ll just have to find the right fabric, now…
Thanks for sharing this tutorial !!
Hahaha…what comes around again! You’ve made it look SO easy, great job.
Stretch-n-Sew was a line of patterns “back in the day” (70’s) where I learned to make undies, camisoles and swimsuits. Camisoles were SO easy!!
I love your tuitorial, and may try my hand at this again, your suggestion to use T-shirts is brilliant!
PS..Good to use a ball-point needle when sewing knits, it will yield a better product by not piercing the threads. The pointy one works, but the ball-point will make you even happier! 8^)
You’re totally right! Thanks for the reminder about ballpoint needles, I always use them when I sew with jersey, but I totally forgot to add that to the supplies list. Thanks!
Great tutorial! I have always been nervous about making underpants but I am excited to try this. Thanks for the giveaway too!
What a good idea! I want to make underwear! Love it.
I love them! The stripes are awesome!
OMG! I was actually thinking about making matching panties for this short dress I made! Thanks!
This is fabulous! I had tried this a few months ago, but had trouble with the elastic — but your photos & videos make so much sense! I am going to have to get some stretch lace & use your method. ‘
I’m so excited for these! I have even been saving some old 70’s stripey t-shirts that would make some amazing panties. Maybe I’ll have to find some orange or avocado lace to go with it!
This has been on my next project list for a while. Just need some elastic and away I go!
I’ve always wanted to try this!
Oh these are so cute and seem so easy to make! Thanks for the tutorial and the opportunity to win!
What a great tutorial and fun giveaway! Thanks for sharing this! Looking forward to trying this! Becoming a follower now, too!
many thanks, this is something I have always wanted to try. a great way to repurpose old t’s and such.
I am so excited. I have been wanting to make my own panties for years and just never tried. Now I will. Thank you.
Can’t wait to try this. Thanks for the tutorial!
Never thought to make my own panties… Looks super easy though
Wow you make it look so easy! I would love to win and give it a whirl! Thanks for the opportunity!
Great looking tutorial. Thanks for doing this. I love your blog.
Wow, you make it look so easy. What a fun project I like that stretch lace is used around the leg openings. I’m putting this on my to do list and I’ll be on the lookout for some jersey knit fabric . Thanks for the great tutorial and the giveaway.
Very nice! This is a fun project to upcycle t-shirts or sweaters as well.
Great tutorial and adorable undies. Thanks so much
Thanks for the video about sewing down the lace. Most helpful!!!
Great tutorial – I can’t wait to try it out.
I’m a new subscriber to your blog as well.
now to find some cool tshirts to repurpose! How fun! Thanks for the tutorial… am bookmarking it now! 🙂
These are awesome! Where do you source your stretch lace trim?
Hi Sally, these come from Lace Heaven. If you look at the “Supplies” list on the tutorial, you will find a link to the exact items I ordered. They work great!!
You make this look so easy! I can’t wait to try it out. Thank you!
WOWIE! Can’t WAIT to try making these! Thank you for such a clear tutorial 🙂
Love these! They are “SEW” cute! Gonna have to make some! thanks for the tutorial!
I am so excited! Just yesterday I was mourning a pair of favorite-but-dying underwear. Wonder about making a ‘sexy’ pair out of my grandma’s old satin gown.
yay! another project that will re-purpose some of those t-shirts I can bear to part with!
Being a big girl and shaped oddly, I think this is the best tutorial ever. When I find a pair of underwear that fit, I don’t have to panic about buying all the pairs I can.
thank you so much! I have been looking for a good undies tutorial!
Man! You made it seem so easy, I want to give it a try! Thanks for the awesome tutorial!
Perfect! I was having a hard time finding this particular design I had in mind… now i can make my own. Thanks!
Oh, and I’m followingthis blog through google reader.
This actually looks so easy, even for this sewing newbie! I’d love to give this a try!
This is so fantastic! Honestly, I’ve been sewing for 30 years and NEVER thought about sewing my own panties. Now my thoughts are racing wondering how much jersey I can find tucked into my stash! 🙂 Tks.
The thought to make my own underwear had NEVER crossed my mind! And now I can’t wait to try it!
Well, I’ve never thought of sewing my own panties before, but this tutorial has me considering doing so. It’s so darn easy!
Hi and thanks.
Just yesterday, I embroidered a flower on a pair of my favorite panties, but I didn’t get it centered quite right. So, now I’ll be able to make my own panties and embroider whatever I want on them, before sewing them together.
Thank you so much.
What an awesome tutorial. Thanks for sharing it.
These are SO neat! i’m am eager to make some for my granddaughter. Thanks.
This is a very clear and easy to follow tutorial. Thank you for making it.
Love the tutorial! I can’t wait to try it out!
I am now a follower! Thanks for all of the creative ideas!
Thanks Sarah, for explaining this so well. especially the point of matching stretch values. i have real problems finding panties to fit at all, so the few pairs that do are like gold and it is a tragedy when they are consigned to dusting duty! I will try this with the very next pair. Are you planning a gallery of readers sucesses? Pegged out on the line of course…
Yes, ever since my favorite pair was discontinued I have worn the same ones just about as long as I can at this point. Now I can make a pattern and do my own. My husband teases me that if I was ever in an accident and they saw my panties he wouldn’t be able to show his face around town anymore. They aren’t thaaaaat bad, really ;-). Love it.
Fabulous directions – sew clear! I have some cotton bamboo knit that has been just waiting for directions to make panties! Now I can go ahead. Thanks so much – I will be making these this very afternoon! Liz
Oooh, I love this! I was just looking through my panties this morning thinking how I need some new ones!! Love it!
Oh, and I’m a new follower!
I love this!! I have been thinking of trying my hand at an intimates line…this will be good practice for me!
I can’t wait to try this! I’ve never made under garments, but now I know it’s really possible, even for me!
Great tutorial! I really need to do this!!!
Sarah,
Thank you for this tutorial. It looks as simple to do this as I suspected it was. Just yesterday I was wondering if I should sacrifice a pair of my panties to try to figure this out. Now that I have some instruction, I think I can manage to do it without destroying every pair of underwear I own!
Almost forgot about this idea. Made a few in the 70’s and got great fabric from Munsingware in Mpls. MN.
Wonder if they still have all those great scraps,?,they would make great panties!
Mahalo (Thanks) a bunch for this tutorial. Will be making some this weekend. Always wanted to do, but with this step by step instructions, definitely can’t go wrong.
I think I would actually make some undies is I won your giveaway. Well…I may make some anyway! Thanks for the inspiration!
Great tutorial – Thanks! Great detail and explaination… I am going digging in my stash!
Very clear instructions. Thanks!
I totally checked out the tutorial. With Easter coming up I am going to have to bookmark this one to do after Easter is all done. Very good idea, and I love that it has very little material and we all already own a pattern.
thanks for the tute and the video. the instructions were very easy to follow thanks
Wow! This looks so easy! I am going to try this! Thank you for the step by step instructions!
Fabulous tutorial. How fun and how much cheaper! WOW!! thanks for the link to fabric.com. I’ve been looking for some nice jersey to make my girls some fun summer dresses. If off to “follow” you.
This is amazing and so easy when explained as you did!
thanx
I’ve been making underwear for a few weeks — easy, quick, and fun. Just found some fold over elastic and plan to try it out this afternoon. 🙂
I’m now a follower!
Excellent tut! I am always short on underwear, and can never find any cute ones in-store, so I can’t wait to try this out!
I really want to try this, since I have no underwear that I really like the fit of. I’ll have to experiment a bit, but that’s okay. I’m looking for material NOW!
You make it look easy. Never really thought about making my own undies, but these are really cute!
~Jenny~
thank you so much for the tutorial for making panties. I do alot of sewing and I have never made underwear. Now I want to do that now.
I always wanted to try to do this (make underwear) but thought it would be too hard. Thanx for making it sew simple! I think I can do it, and by following your instructions, I’m pretty sure they won’t be uncomfortable to wear. Kudos to you, and thanx again!
I like and definitely going to try it! I was already searching for something like this en see here it is.
Thanks
My family has laughed at me for making my own panties and I’m so glad to see I’m not the only one! I too made a pattern from my favorites that are now a discontinued pattern. One thing I do differently, is that I cut the pattern in one piece; front and back still attached at the crotch. In other words, I only cut the side seams and then folded the panties out to make a pattern. I love the visuals – awesome tutorial!
Would love to win! Thanks for the giveaway!
this is the best tutorial i’ve found. i’m going to see about making some without the cute lace-elastic … well, unless i win your giveaway! 😉 here’s hoping! thanks for the tutorial! ❤
I love this tutorial! Now I just need to find some fabric I LOVE to make lots of new pairs.
I’d like to enter if you are taking international entries.
yay!!! thanks, sarah!
[…] An underwear tutorial! […]
[…] by wearing at least 1 handmade item a day. It’s hard! I am curious though on handmade underwear, that might be […]
I made on using this tutorial! It came out great, but the elastic I used for the waistband is a bit old. It’s very comfortable however, just need to make minor adjustments. Thanks so much for making this tutorial!
I came across your tutorial today. I’m not a sewer (unfortunately) but I love your idea. Can this be done with the slick “fancy” material as well?
I need to replace the lining in some of my undies and have 2 questions: 1. Can they be sewed in by hand? 2. Can I make the lining from an old cotton t-shirt.
I’m a little worried that the stitches done by hand will look bad, so let me know if there’s a trick to it. THANKS!!!
i really want to try making my own but i have a few questions first. ive never sewn anything thats stretchy, can i hand sew this? i have a machine but i prefer hand sewing. if i can how would i go about sewing on the stretch lace? lastly i was wondering if it has to be jersey material? can i just use cotton? sorry for bombarding you with all the questions. im self taught at sewing so i dont know much yet, im barely venturing into new things. thanks for taking to time to read this, id love a reply.
-scoof 🙂
[…] is mostly because I don’t have a lot of experience with stretchy fabrics. Sarah has a tutorial I want to try out when I get brave enough. I could probably even make an underwire bra if I had […]
awesome! loved! hoping to see more!
owesome…….can u teach us how to make undergament…..
I loved this tutorial and I was really looking forward to making some “new” undies! However, once I started sewing, my stretch knit fabric kept getting caught in the hole on the plate below the needle (i’m bad at the technical terms!!)
Anyone have any suggestions?
Thanks,
Lauren in Maryland
Hey Lauren!
Glad you liked the tutorial. I think this is a pretty common problem with sewing machines when sewing stretch material like jersery. Are you using a stretch needle (ballpoint)? You can also try starting to sew about 1/4″ in from the start of the fabric, to prevent it from sucking it into the machine. If this doesn’t work you can try to start sewing on a small scrap of fabric and then feed the stretch fabric under the presser foot. Hope this helps!
Sarah
Thank you so much for sharing this tutorial! I used it with a little imagination and made a high-waist pair with seams over the front of the thighs instead of at the sides. I made them with stretch lace instead of jersey (except the lining of course) and was super intimidated by the elastic lace trim until I watched your video. Thanks again! I doubt I’ll be paying $20 for a pair of fancy underpants anytime soon.
[…] Free Panty Tutorial […]
Thanks!! Been looking for this for like forever!
That is so cool! It would be fun to win the fabric so I can try this for myself!
woohoo, i wanna win this!! great idea!!
[…] This tutorial will take you, step by step, through the process of making underwear that fit you perfectly and look great too. You can click on any of the photos in each step to enlarge them (which will make reading the text on some of them much easier). Please use this pattern for personal use only, and feel free to link back to this post. As always, I encourage you to Contact Me if you have any questions throughout the process, I love to hear … Read More […]
I hope you don’t mind that I featured you:
http://allawesomelinks.blogspot.com/2011/07/make-your-own-underwear.html
Wow…being a woman of ample girth…I am definitly going to try this. I’m a little tired of white and I refuse to pay $10.00 a pair for the fashionable ones. Thanks for the tip!
[…] woman, regardless of size, shape, or economic status, deserves to have adorable underthings. Here’s a great tutorial on how to sew underwear, from comeandseetheseitz.com. Not only is this a great way to upcycle t-shirts, but it seems like […]
this sounds like fun!!! i want some underwear as welll 🙂
[…] are plenty of instructions on the internet for how to do this with women’s panties, but not for men’s […]
awesome tute! I can’t wait to try this. I just did a search on Etsy for lace trim and found this store, which looks like it sells just trim, and has some pretty cool stuff. I don’t know the person who runs this store, so I’m not trolling – I just thought it might be useful to other readers of this post.
http://www.etsy.com/shop/ssong?ref=seller_info
I made some! http://blog.mummybrain.com/2011/10/knickers-knickers-knickers.html Thank you so much.
hi wow – i will love some material to make some of these – if you still have any to give away i will love that – thanks joyce
[…] How to sew your own underwear (just in case you were wondering…) […]
[…] Oh yes you can! Sew your own underwear, that is, with this sewing tutorial from Come and See the Seitz. […]
I was super excited to find this and got started right away….only to find the ‘stretch lace trim’ I bought at JoAnns was in fact NOT stretchy! UGH! They turned out SUPER cute just can’t wear them.
Thanks for posting this. Old Navy no longer makes or sells my favorite mesh boyshort-style panties and I was going to give up and buy my second favorite lace-waist hiphuggers from VS. Glad to see that making them is so easy.
Any tips on where to find a stretchy mesh material?
[…] 5. Underpants […]
Thank you soooooooooooooooo much for this tutorial! It helped me to complete my daughter’s semi-tankini bought on sale last summer!
Even if we don’t speak your language, pictures and video are extremely helpful!
Keep on your great work!
[…] following this blog, made these […]
I know this is an old post, but thank you. This is just what I needed! You did a great tutorial, very clear and well photographed.
I have looked so long for a tutorial I can understand. You make it so simple I feel silly for not having gotten it before. Vid really puts the icing on the cake. Time to finally tackle the heap of t-shirts I couldn’t bear to part with!!!
You did a very nice tutorial, clear and simple. 🙂 I have just started making skivvies for my kids and have tried a few different ways and am working on perfecting a boy cut pattern for my teenage girls. They have spent the last several days trying on knickers, ha! I’m also working on a boxer brief for my boys using old tees. It’s loads of fun!
This has literally changed my life!! I used to hate buying underwear…it was expensive, never fit and I hated it! Now I love it. It fits me perfectly and costs me virtually nothing. I’ve made 3 prototypes and now have my pattern perfect. Thank you for such a clear tutorial.
I need new underwear but Im too broke to buy them and Im too broke to buy Jersey. If I win the fabric I wont have to make them out of old wool sweaters. Im alergic to wool 😦
Great tutorial thank you so much they charge so much for so little I’ll have to try this for sure Thanks
[…] find elastic that would work for this project and how much it would be, when I stumbled upon this interesting, detailed, and AWESOME tutorial! She shows in great detail how to make a pattern from an old pair and then shows step by step how […]
Love this idea. Can’t wait to make some.
[…] are a pair of pants for Josiah, a skirt for Gwen and… wait for it… wait for it…. underwear for me! I am simplydyingto see how easy it can be to make my own undies because I hate buying […]
[…] Panty Tutorial: How to Sew Underwear « This tutorial will take you, step by step, through the process of making underwear that fit you perfectly and look great too. […]
great job! I just learned how to make undies, but got a few good tips from your tutorial. thanks!
I am now a faithful follower!
I’ve been looking for a tutorial to sew a pair of undies since I recently started using my old sewing machine. When I cut up an old pair of undies the fabric was too worn and stretched to get an accurate size so I found a sized pattern elsewhere. Both your and her tutorial use t-shirt material, but I had a different fabric and had to fold over and make seams to prevent fraying. Not bad for a first pair, but I need to tweak it a bit! Thanks so much for getting me started!
[…] Well, they’re not perfect, but I’d say I did a pretty darn good job on that pair of undies. I combined two different tutorials – indigo orchid’s sized pattern for t-shirt underwear and Come and See the Seitz’s underwear tutorial. […]
This is great I just wrote a tutorial simular to this but I like your pictures and details. I learned a little something that I could add to mine as well. I think I will try to add a link to this tutorial on my post as well. Great job!
These are cute.
I didn’t see it mentioned above, but another option for elastic is to use FOE (fold over elastic). I personally don’t care for lace on my panties, but I can get FOE on eBay, easy & cheap.
[…] Underwear […]
[…] Panty Tutorial: How to Sew Underwear «MaryJanes and Galoshes: Kid’s underwear sewing pattern70 Free Lingerie Sewing Patterns :SuperNaturale T-Shirt Underwearbelle and burger: Panty Tutorial: How to make your own drawerssewing underwear: the (free) pattern | indigorchidHow to Make Your Own Underwear – CraftStylish […]
I wasn’t too sure about making my own panties, however, Friday night, I thought i would give it a try. Very easy to follow instructions. It went fine, wore them the next day and they were very comfortable. Hancock Fabrics even has an elastic package that has smaller trim for legs and a bit wider for the waistband.
Thanks so much for sharing
[…] found some great tutorials online with different ideas and techniques, like this and this and this, but I mostly just used an old pair of my own undies to use as a pattern. I […]
Wow, you are really talented. Pretty impressive. Sexy boy shorts are the hottest new trend right now.
HA! Your comment made me laugh. I didn’t have much luck cutting up an old pair of undies for a pattern, but I did like Indigo Orchid’s pattern/tutorial (http://indigorchid.wordpress.com/tag/underwear-pattern/). I made the medium but found that the large fit me best.
Sarah, you missed my point! The illustrations show undies for petite gals only, not even the national average size of a woman in the U.S. And, like “karlamcurry” above, I also tried using a pair of my own panties, but they still turned out to be an uncomfortable butt-hugger, showing my crack! I have no idea how this happened. Also I created my pattern using a brown paper grocery bag, but THE BAG WAS TOO SMALL TO MAKE A PATTERN FOR MY BUTT!
I just wish I could see a pattern for some big, comfortable undies (knowing NO ONE ELSE WILL EVER SEE THEM, right?) even if it means printing out and piecing together several sheets of paper from a PDF to form the right size for my butt.
But…(no pun intended), I will visit the link karlamcurry provided. Thanks!
Oh, BTW, where’s my original post? I don’t believe I violated any commenting rules!
I deleted the comment since it used a word that can cause people to find my blog while searching for porno (this has happened before)…I wasn’t keen to have any keywords in here that could further that endeavor. Sorry about that, hope you’re not offended. Good luck in finding a pattern that works, I was simply posting the images from making the undies for me, and that’s why all the pics are of a size medium.
Can’t wait to make some panties. Great video and instructions
Love this tutorial!
I am a side sleeper and LOVE panties that dont have side seams, the seams dig into my skin when I.m sleeping it seems. I had some a long time ago and cant find any anywhere. I would love a pattern that would show how this could be done .Thanks this is a great site .
Well, this settles it. I am going to have to start making underwear again. A friend and I took a lingerie course 30 some years ago and made it all. Been a long time but but we had fun doing it.
Thank you for writing this! I write about festival fashion and included a link to this. So fun!
much love
the Playa Diva
[…] Women’s undies out of old tshirts by Come and see the Seitz Men’s undies by […]
Great tutorial I’m going to get started
Thank you so much for this awesome tutorial! In short I have been searching for the perfect pattern to make my 4 year old daughter underwear that will actually fit her. The store bought kinds always are to big in the front and don’t cover her bottom! I have been on a quest to make her the perfect pair myself with barely any sewing knowledge and you have REALLY helped me! Thank you soooo much!
What kind of sewing machine are you using in the tutorial? It looks really great looking.
i was so happy to find this. i have been looking for white panties for my girls (and you cannt find any ANYWHERE) i,’ve been sewing their clothes for years but never thought about there undies . thanks so much . going to go some white material and ill let you know whow it goes…….
Reblogged this on kaylamessies and commented:
How Cool!
I have bought a nice satin and absorbant cotton cloth. I am going to seive a very sexy panty for my wife for her birthday!!! maybe it fits well and she feels happy.. I always give her gifts on many occassions, but this time let it be special. any idea of flat stone work on the middle of front surface? The satin is cherry red and it covers the front. the middle part would be 2 layers of cotton cloth and back would be satin. I am also looking forward to make a design of period panty for her. any ideas?
[…] 2. DIY Undies – Move those shirts from your t-shirt drawer to your panty drawer with this simple tutorial. […]
Thank you so much for placing this tutorial on your site. I am looking forward to making undies for myself and my daughters (ages 2, 4, and 6). Things are tight, but we always have clothing someone does not want anymore or people in our church giving us things when asked. So with all the fabric I now have, and thanks to you I will be able to sew all that I need to for myself and my girls. Many blessings to you and yours.
I just wanted to send you a hug. It is wonderful that you are sewing for your family. Some “search words” I find useful when looking for clever ways around a tight budget are “frugal”, “penny pincher” (not as deprived as it might sound), upcycle, recycle and generally any blog with the word “Mum”/ “Mom” in it. You are not alone.
Any tips for someone that doesn’t have a serger?
These can also be hand sewn, just remember to keep the elastic tight 🙂
Wow, that is a LOT of replies 🙂 could it be that I’m not alone in thinking underwear is insanely overpriced and often poorly made? I’m going to try this right now !
I have always had it on the to do list, but you have made it so easy and simple to follow. Thank you for the comprehensive instructions and the video:)
I LOVE THIS WEB SITE!!!!!!
Wow very clever idea lol ❤
So many great comments. I have been want to do this, just like so many others. Thanks for making my day better.
I have been looking online for this pattern,I actually had a pair of panties layed out going to make a pattern from ,also had the paper(that came in a xmas gift) to use to make a pattern,I am at last on the right track,I feel now with this tutorial I can make them,it started when I went to buy new ones & they were $6.00 a pair & determined I would not pay that much,I have a trunk full of fabric,so why not try,than you so much
Hey!!!! That was AWESOEM, THAT WAS GREAT, THANK U A BILLION MILLION ZILLION
أشكرك على الموضوع المميز جداا انا في غايه السعاده لانك ساعتيني في معرفة طريقه خياطته ساطبق هذا الموضوع في اقرب فرصه
Thank you for the tutorial, you make it look easy. I’m amazed how you are able to sew on the edge with the zigzag stitch, I still have issues going over the edge or not getting too close. I have a serger, but am still uneasy using it for jersery knit fabric since I’m still learning how to use it so I could use all the practice I can get.
Thank you again for the tutorial and the giveaway offer!
so neat! cant wait to try it! 🙂
Fantastic ! Thank you so much for the Perfect instructions! You really make it look managable!
😃
Is there another trim option out there other than lace? I’m not a lace person, especially on undies (find it to be itchy).
Excellant breakdown of step-by-step details…thanks so much!
[…] https://comeandseetheseitz.com/2010/03/09/panty-tutorial-how-to-sew-underwear -How to sew underwear […]
i will also make some for the guys in my house, using one of their old pairs for a pattern. sans lace, of course. i have tons of old t shirts. now i can stash them to make these without feeling like a fabric hoarder.
So so cool and really easy! Thanks for posting this!
Very lovely tutorial. thanks!
[…] https://comeandseetheseitz.com/2010/03/09/panty-tutorial-how-to-sew-underwear -How to sew underwear […]
Reblogged this on From Iowa to L.A. and commented:
I found this tutorial on YouTube one day while I was searching around and added it to my ever growing list of “DIY/Sewing/Crafts.” I told my friend, Emily, about it too and on Saturday we opted to put the plan in action. We went to the fabric store and searched around for some fabric that not only would be hygienically friendly but also cost effective. Every girl knows that buying (cute) panties can be a pain in the butt (LOLOLOLL) and really expensive so we wanted to find an alternative. We found some fabric we liked, got the trims, etc. and our bill was only $15! We didn’t know how much we were going to need really but now that I’ve made my first pair and I have tons of fabric left over I plan on getting a lot of panties out my 1.5 yards. I used a regular sewing machine to make mine since I don’t have a serger and a zig-zag stitch seemed to work out just fine for me. The only thing about this tutorial that we found didn’t work was the leg bands. I don’t know why but for some reason when you go to put the stretch lace on using the same measurement of the old panties it is WAY to tight. Even though the old ones fit. It happened to Emily so it just seems to be a bit of a mysterious problem across the board. I recommend adding at least an inch to the cut off leg bands. I tested out the homemade panties yesterday to see how they worked out in a normal day of going to school and since it was ungodly hot yesterday just how everything was going to go. I am happy to say this was a COMPLETE success! I will never be buying store bought panties again!
[…] Sewing my 4 year old new panties….. Here is a link to (someone else’s) blog post how to make your own panties… any size.. They turned out […]
[…] Tutorial calcinha […]
This is great tutorial. Only problem for me is, I recently lost a lot of weight so the lace will cause a chafing issue. Would it work with thin elastic covered in jersey, maybe?
I think it would, give it a try!
Sarah
I thinking of making some from the bamboo jersey in my stash
Wow..this is great tutorial. Simple and easy to follow esp with the photos inserted.
pretty much the ONLY tutorial to make panties that actually has lining, I LOVE YOU, thank you so much
Great article.
I wear nylon granny panties and cut apart a pair (as you did) and found that by adding some extra fabric to the inside front leg and front panel height, they better accommodate the male anatomy. Not needing the cotton insert, I use double nylon as it feels better. I also added to the side rise to give fuller coverage in rear and more room in front.
Thanks for your post !
Hi Ray, it is nice to see other guys who are also handy with a sewing machine. I also found this article today, and not long after a new, very comfy pair resulted from an old t-shirt. The pattern was from one of my old pairs, and with very few small changes it looks and fits better than many a pair i bought in the shops.
Happy sewing. 🙂
Enpassant devant le bureau représenté par une petite femme sèche quin’avait pas l’air trop jovente, le bourgeois dit: Ce sac pas cher sont des amis,et après nous avoir installés, il alla à ses affaires.
[…] Inspired by Come and See the Seitz […]
[…] 3. Make Your Own Undies – A slave to Victoria’s Secret, no more! Check out how to make your own, cute undies from an old tee. […]
It’s very clear the tutorial, i need it to make my own underwear.
Thanks!!!
Hey there, You will have completed a tremendous career. I’ll surely stumbleupon it plus independently advocate in order to my buddies. We are self-assured they shall be taken advantage of this website.
That is really attention-grabbing, You are a very professional blogger. I have joined your feed and stay up for looking for more of your great post. Also, I’ve shared your website in my social networks
[…] ready for the bin so I decided to sacrifice them to make a pattern. For my first pair, I followed this tutorial from comeandseetheseitz. I’ve since seen tutorials showing you how to make a pattern without cutting up a pair. My […]
awesome! thanks very much for sharing!
[…] You find free knicker patterns around the internet here at So, Zo…, at mademoiselle chaos maybe you like the rosy ladyshorts pdf and here you can find some instructions how to copy and sew your own panties. […]
[…] Bra Tutorial via Love Aesthetics Panty Tutorial via Come and See the Seitz Strapless Bra to Bustier Tutorial Half Slip Pattern from Gertie’s New Blog for Better […]
Can I get more samples and knowledge about making bikini and undergarment bcoz I want to run my own business and can u help me about machinery and total cost to open this business.
This is a brilliant tutorial.
As a guy (straight as an arrow) who likes to sew for fun and business, i had no problems with making myself a new pair of underpants using my favorite pair that was getting a wee bit old.
An old t-shirt that was almost ready to become a carwashing rag due to age became my material, and not long after i had a nice new pair of unmentionables. 🙂
Thanks again, this tutorial is really foolproof.
I am size 26 Australia, I cannot find a pattern for lingerie, any suggestions. Would be appreciated
Good day! Do you know if they make any plugins to assist with Search
Engine Optimization? I’m trying to get my blog to rank for some targeted keywords but I’m not seeing very good success.
If you know of any please share. Thanks!
Incredible! This blog looks just like my old one!
It’s on a entirely different subject but it has pretty much the same page layout and design. Wonderful choice of colors!
[…] 3. Make Your Own Undies – A slave to Victoria’s Secret, no more! Check out how to make your own, cute undies from an old tee. […]
Hi, I just wanted to say thank you so much for this tutorial. I made my first pair of pants today and they look great!
Great tutorial. I want to make my own panties but I just don’t know how to start. Now that I found this tutorial, I’m definetely gonna try this. thanks so much!!
This is great. They stopped making my favorite underwear. I told a friend I was going to sew my own and she laughed. I’m not sure about the jersey. I want 100% cotton, but I might browse a little.
I was suggested this web site by my cousin. I am not sure whether this
post is written by him as no one else know such detailed about
my problem. You are wonderful! Thanks!
For hottest information you have to go to see world-wide-web and on internet I found this site
as a most excellent web page for most recent updates.
This is my first time pay a visit at here and i am really happy to read all at one place.
Are you one of the many individuals who likes kitchen gadgets.
But I do not use the sponge in its mouth because it looks too pretty, so the fish is now
the guard of the sink. Toaster ovens, which can cook anything from toast to whole chickens, reduce the use of oil compared to a
fryer resulting to a healthier meal.
Wow! In the end I got a weblog from where I be capable of in fact take useful facts concerning my study and knowledge.
Only attempt now Sonic Dash Crack!
Watching online movies is the one of the newest web trends that is
increasing with each passing day. Include some digital swag in your entertainment promotions campaign if you are sponsoring a
special event. On the previously discussed sites that offer
links in order to websites which you will see movies, most of them allow the
visitor to look through film name or even by type the industry great tool to find your favorite film extremely fast.
An intriguing discussion is definitely worth comment. I do believe that
you need to publish more on this subject matter, it might
not be a taboo matter but typically folks don’t speak about such subjects.
To the next! All the best!!
Hey there, You’ve done a great job. I will definitely digg it and personally suggest to my friends.
I am confident they will be benefited from this site.
Here is our Samsung Galaxy S manual that will help you to get the most out of your cell phone.
The exact technique applies to the Samsung S307, Samsung X600, X660 and Samsung X480.
On the other hand, with speedy reply a concept box seems in excess of the leading of whichever else you’re carrying
out and lets you to respond to the SMS there and then without the need of closing your
programme.
I aam in fact delighted tto glance at this weblog posts which conains lots of useful information, thanks for providing these kinds
of data.
I every time used to read article inn news papers but now as I am a user
of net thuis fdom now I am using net for content, thanks to web.
Wonderful goods from you, man. I’ve consider your stuff previous too and you’re simply too wonderful.
I actually like what you have acquired here, really like what you are saying and the
way through which you are saying it. You are making it
entertaining and you still take care of to keep it smart. I can’t wait too learn far more from you.
This is really a terrific website.
Enhance the effect of an elliptical machine as a 24hr fitness trainer, by deciding upon a
machine that also capabilities handlebars for a incredibly effective total human body exercise.
To be able to be in a kickboxing class in Elmhurst, NY and know that you are
accomplishing many different aspects of life is just amazing.
Article Source: Mc – Kay has worked with the fitness industry for over 20 years now.
Great delivery. Great arguments. Keep up the good work.
My partner and I absolutely love your blog and find many of your
post’s to be exactly I’m looking for. Do you offer guest writers to write content in your
case? I wouldn’t mind writing a post or elaborating on some of the subjects you write
concerning here. Again, awesome web site!
I drop a comment each time I appreciate a article on a website or if I have
something to contribute to the discussion. Usually it is caused by the fire
displayed in the article I read. And on this article Panty Tutorial: How to Sew Underwear
|. I was actually moved enough to write a thought :
-) I actually do have 2 questions for you if it’s okay.
Is it only me or does it look like like some of the comments appear as
if they are written by brain dead visitors? 😛 And, if you are writing at other online social sites,
I’d like to keep up with you. Could you list the complete urls of all your public pages like your twitter feed, Facebook page or linkedin profile?
Please let me know if you’re looking for a writer for your
site. You have some really good posts and I believe I would be a good asset.
If you ever want to take some of the load off, I’d really like to write some content
for your blog in exchange for a link back to mine.
Please blast me an email if interested. Thanks!
Blogs are quickly replacing the traditional search engine optimization choices, pleasing graphics and sparse,
flat, boring, but serve as the Internet Cloud. In the market
place carefully, discounting any company wiselybefore it
s not exactly a web design, and this is very easy but can also achieve this is not very strict, it is!
Justifiably there are several types of websites, these
is no business should know search engine optimization how.
The business unlicensed contractors has a
portfolio of previous CEO Carly Fiorina. With the help of a home contractor or
a major investment; and its accompanying long
drying time of steady use, and you’ll lack any one-on-one time
with hapless planning. The Rule4 website is a large number of
unlicensed contractors hours with the state offered bond program.
In this fascinating race clothing are vital to install decorative concrete contractor goes about everything involved in the roof yourself or hire a contractor that is
not only adds to their customers.
The bad section was removed re-tiled school bus and reglazed and here we will
look at it, will you can do is hire an experienced contractor might be
tempted to save all documents related to national defense.
She was part of the demolition, excavation has to be. Likewise, the more you ask your current roofing will be able to identify
any type of home contractor. Make sure that you
are laid to carry workers compensation program.
Howdy would you mind letting me know which hosting
company you’re using? I’ve loaded your blog
in 3 different web browsers and I must say this blog
loads a lot faster then most. Can you recommend a good web hosting provider at a reasonable price?
Thanks, I appreciate it!
I’m gone to say to my little brother, that he should
also pay a visit this web site on regular basis to take updated from most recent news update.
Spot on with thi write-up, I honestly think this web site
needs a lot more attention. I’ll probably be bak again to see more, thanks
for thhe advice!
Wow! In the end I got a blog from where I bee able to actually take useful data concerning myy
study and knowledge.
My family always say that I am wasting my time here at net,
except I know I am getting know-how all the time
by reading such nice posts.
Amazing!!! Thank you
Thanks so much! I used to make many stretch items for my daughter, including panties and swimsuits but have not for many years. I will be following this detailed tutorial to make my own panties. I wear a plus size and am so tired of not finding plain, solid colors. It seems they make my size in the most awful colors and patterns! 🙂
Reblogged this on thehalfnhalf and commented:
brilliant tutorial! :3
Recently I have been really looking on Bing hoping
to locate blogs with any sort of info about how to play table
soccer ps vita and wound up on comeandseetheseitz.com.
Thank you for writing this excellent information. I just wanted to
say thanks this is just what I needed.
[…] Image Credits […]
Email is okay, printed (if their economics justify it) is
better. My own business coach preached about how writing articles got her to a 6-figure income.
Most people have no tolerance for an overcrowded,dusty used bookstore.
If you are unsure here are some signs of possible drug use:.
If you do have the budget to buy some of these fun and unique instruments,
then I would suggest Music in Motion, Musicians Friend
or West Music. All the while, the four coeds are only wearing Day-Glo bikinis
and sneakers.
Often times, builders will install cheaper and less energy efficient windows to save some
money. They give your home personality, and they act as a conduit of visual information to and from the outside
world. Revamping your home by replacing old
furniture with a new one is a good example.
Generally I do not learn post on blogs, but I would like to say that
this write-up very compelled me to take a look at and do so!
Your writing style has been amazed me. Thanks, very great post.
Your whole family may benefit if you watch and play games with your children.
Search online for reviews by other parents to find some examples of games that may be
appropriate for your child. Also introduced today is the ability to watch an attack on one’s village while it’s
happening, Level 7 Giants, and the ability to compare one’s clan to others
in clan local leaderboards.
can’t wait to try this!
Love this tutorial! I willl make these for my granddaughter when I have a chance. With the right jersey material and lace am sure she will be delighted!
So cute! I tried making panties for my daughter and it didn’t work out, so I am so glad to find this tutorial. Thank you very much!
Thank you! Finaly a tutorial I can follow and the video really helped.
Super cute!! I can’t wait to make my own 🙂 THX!!
This is my first time visit at here and i am genuinely pleassant to
read all at alone place.
I know this web page gives quality dependent articles or reviews and
extra material, is there any other web page which offers these things in quality?
Establishing the wireless networks is not an easy job, though it gives consistent
and proficient services. Climb the stairs and go through the doorway across
the room down the stairs and then enter the Bathysphere
and pull the lever. You could even invite your partner into the bath
with you and have a romantic evening together.
Thanks u so much..i realy understand it very well
Yes! Finally something about how to make t shirts.
Why users still use to read news papers when in this technological globe everything is available
on web?
I was recommended this website through my cousin. I am now not certain whether this
post is written by him as no one else recognise such specific about my difficulty.
You’re amazing! Thanks!
Thank U… 🙂
[…] Panty Tutorial: How to Sew Underwear […]
Thank you! Thank you for the nice Tutorial, I have seen a lot of them and yours is very easy, I have been sewing for years and I am very excited to try your easy way. Many Thank 🙂 ❤
Ich bin gerade zufaellig auf Ihrer Seite gelandet (war auf der Suche nach einer anderen Seite).
Ich moechte diese websiete nicht verlassen, ohne Dir ein Lob zu dieser klar strukturierten und
schick designten Seite zu hinterlassen!
Hurrah! After all I got a web site from where I know how to really
obtain useful information regarding my study and knowledge.
Hi, I am a fashion design graduate from India. I am planning to focus my career towards a lingerie designer. I needed some basic tips and I think your tutorial helped me to understand the basics. I would like to try it at home but i don’t have an old panty to make pattern out. And I would like to get some jersey too if you have extra. Thank you.
Definitely consider that which you stated. Your favourite reason appeared to be on the net the simplest thing to keep in mind of.
I say to you, I certainly get annoyed at the same time as other
folks think about issues that they plainly do not realize about.
You managed to hit the nail upon the top and
outlined out the entire thing without having side effect , people could take a signal.
Will likely be again to get more. Thanks
anyone have a pattern for seamless (just one fabric piece)?
Cheers!!
[…] I don’t know why it took me so long to work this out. Check out this great tutorial, and this one. Well I stocked up on old T-shirts from the op shop, grabbed my bag of elastic (also collected […]
Reblogged this on The Q effect.
I can’t really sew yet but I’m trying really hard to learn on my own. Going to start with your tutorial tonight. Fingers crossed!
what kind of stitching machine is suitable to stitch this
As the Grandmother of 3 growing girls…(ages 5…6…&11) …I Thank you immensely…your tutorial was the first I clicked on…and the ONLY one I’ve utilized…my ‘virgin’ attempt…was making my own….and I spent approx 45 minutes….from start to finish…I’ve now made 10 for each of my granddaughters…and 6pr for their mother…and I’d say with having made over 50 pair…and not one of them knows they’re handma!de…(dont ask…LoL don’t tell…)I’ve coordinated solid color tanks to go with 2 pr of panties for each of them…SO EASY…SO ADORABLE!!!
It has been time very well spent…THANKS AGAIN…😊😊😊
[…] Source […]
[…] Source […]
[…] Comment faire le patron d’une culotte a partir d’une vielle culotte+ tuto du montage ici […]
You make it look Soo easy to see underwear. Do you see it still by any chance.
I followed the directions and had made a undies last week, I was pleased with the result. I think i will make more of them in the future.
I was looking at the pattern of the lace undies, and I was really puzzled that why the Medium size was 25 inches wide while the Large size was 24 and 3/4 inches wide. Is there any special reason for it or just a typo?
Where are you looking at a pattern?
[…] actual pattern for this, just looked up a couple tutorials and traced from clothes I already had. Here’s a blog post with a similar procedure for making panties. The bra, on the other hand, can best be described as […]
Thank you, thank you!!! I absolutely think your tutorial is awesome. You did such a great job making it look sooooo easy. I’m off to make some. I’m excited!!!
Добрый день.
http://новостройка-ростова.рф
Попала на данный ресурс совершенно случайно, после трёх недель поиска в Интернете жилья для покупки. Связавшись с сотрудниками вебсайта, я смогла узнать все условия сотрудничества с данным центром. Сотрудники центра помогли при выборе квартиры и оформлении ипотеки, а также оказали помощь в переговорах с компанией-застройщиком – зарезервировали квартиру по старой цене. Я очень довольна сотрудничеством с Центром продаж нового жилья в Ростове.
Absolutely superb and simple to follow. More please
Your approach seeems easy to follow & I appreciate all the input as I am definitely thinking about retrofitting some of my current underwear and eventually making new ones. I get so frustrated because either I can’t find panties that don’t have a crotch seam that goes halfway up my rear (if u have ever seen someone with a pair of these bend over in front of u, u know what I mean) or the crotches are not cotton and there’s nothing to adhere pantiliners to. Plus I’ve always liked lots of color & design in my ‘no see um’ garments & it would be fun to choose material with great designs at times instead of just my redyeing efforts.
[…] 3. Make Your Own Undies – A slave to Victoria’s Secret, no more! Check out how to make your own, cute undies from an old tee. […]
Thanks 4 d tutorial , will b trying this soon ,got lots of scraps 2 use
[…] Slip (mit Anleitung zum Herstellen von Schnittmustern) von ComeAndSeeTheSeitz […]
Hi Sarah, i will never run out of new ones to wear 🙂 Feed us more of your creative, money saving ideas we could also share. This is awesome!!!!
[…] comeandseetheseitz […]
Very cute I’m going to give this a try great instructions ty!!!!!
Very cute I’m going to give this a try great instructions ty!!!!! Xo netta
[…] krångligt (fast det bara är 3 bitar) att förstå hur de egentligen ska sys ihop, men jag hittade denna tutorialen där det beskrivs ganska bra i bilder. I stort sett kan man säga att alla tre bitarna ska sys ihop […]
What a clever idea!!! I cant wait to give this a try!!!!!
Very nice information I will soon make it for me.
Thank you so much for this tutorial. It helped me make my first actually good pair of undies. I used less-stretchy fabric than my pattern underwear and didn’t increase the cutout size enough so they aren’t actually wearable, but they’re technically sound and gave me the confidence to try again! Thanks again!
This looks so easy to do.I’ll have my own knicker factory in no time thankyou.
Hi Thanks for the tutorial,I always wanted to sew an underwear. I like your machine is beautiful. Where did you buy it.
Lillian
This tutorial is wonderful! Very clear, simple, and accurate. I followed it exactly and it worked out so well. Thanks so much!!
Very good article! We are linking to this particularly great
post on our site. Keep up the good writing.
[…] elastic element. I spent a while trawling the many patterns online, and finally found success with this one from Come and See the Seitz. Her idea is simple: take an existing pair, cut them into three (front, […]
[…] toch vaak meer ervaring mee en een beter idee over. Ik kwam uiteindelijk uit bij de tutorial van Come and see the seitz. Hier wordt beschreven hoe je het patroon kunt overnemen van een bestaande (oude) onderbroek, hoe […]
I see you don’t monetize comeandseetheseitz.com, don’t waste your traffic,
you can earn extra cash every month with new monetization method.
This is the best adsense alternative for any type of website (they approve all websites), for more info
simply search in gooogle: murgrabia’s tools
[…] Tutorial de bragas […]
Wow! So easy to understand.thanks 🙏so much for this tutorial now I can make my own underwear😇🤡🤗
Hi- nice! I didn’t know you could make these- I’m going to make mine with side beads- thanks
Thanks for the easy to follow explanation 😊
Looks very easy. I cannot wait to try it.
You make it look easy and I can’t wait to try !!! Thanks for the pix and video! April b
This is so well done!
Thank you! I’ve been thinking about making panties for a lot of years. Never got around to it!
And yours look so cute!
[…] don’t know why it took me so long to work this out. Check out this great tutorial, and this one. Well I stocked up on old T-shirts from the op shop, grabbed my bag of elastic (also […]
This is a must try! Love the pattern. Thank you 😊
[…] don’t know why it took me so long to work this out. Check out this great tutorial, and this one. Well I stocked up on old T-shirts from the op shop, grabbed my bag of elastic (also […]
Hi, followed your instructions. I used nylon tricot 40 denier fabric (donated to me) and a pair of full brief granny panties. I now have a silky pair of panties to wear that feel good on me. More to follow, I’m sure. {hard to find nylon panties for men}
Thanks, Ray.